 See all the Spartan Hoplite Costume articles here!
 This year I'm re-vamping my old 300 costume and making it better and shinier! First off, a new helmet!
Any good Spartan needs a helmet, but unfortunately I am not a metal-smith. So I made mine out of items I had around.
Materials Used:
Heavy Gold Poster Paper (JoAnn Fabrics, about $2)
Pink Foam Board
Duct Tape
Gold Paint
Glue
Fake Feathers (black) Trim (JoAnn Fabrics, $2 with coupon)
Thin Plastic Helmet (party favor from Party America, $1)
wire (I use 14 Gauge Cerro Wire; rubber coated wires, same as from my batman costume)
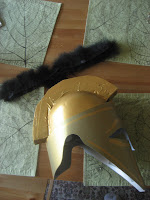
 Step 1) Find scaffold for helmet: I knew I needed something to build my helmet around, and didn't want to go the same route as the batman costume (where I made a duct tape mold of my head). So I went to Party America to try to find a cheap hat of some sort that would have enough structure to be able to build on it but not cost much. I was fortunate to find pretty much exactly what I was looking for in the form of a $1 party favor military helmet. It is made out of super thin plastic, but fit my head (many other options were too small) and was crazy cheap.
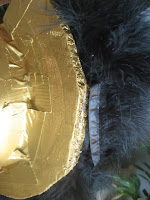
Step 2) Make crest: I used Pink Foam Board to carve a crest for the helmet. I set the helmet next to the board to get an idea of the general curve of the helmet, then cut out the foam accordingly. It took a few alterations to get the final cut right, but since I knew I was going to cover the base with duct tape it didn't matter if it wasn't too pretty. I glued the foam board down, then added duct tape to make sure it stayed there!

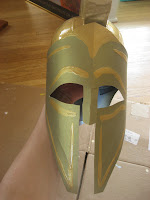
Step 3) Make Face Mask: I used the single piece of gold poster paper for this, and actually only used half of it. The basic idea was to first wrap the helmet entirely around with the paper to get an idea of how wide it needed to be, then cut the shape. At this time I also had to trim the edges of the plastic helmet (they made a tiny brim). The schematic drawn here is the best explanation, but I'll also try with words alone. To get the right fit, wrap the paper around the helmet tight enough so that the helmet stays in one place but does not bend/collapse (do not connect the two yet though). From the inside, duct tape the paper together so that it keeps its cylindrical form. Now flatten it, so that the seam of the paper is on one end and the front/nose of the helmet is on the other end. Cut out the rough shape of the helmet while it is flat so that each side cuts the same (do small cuts, then put the paper back around the helmet to see how it is going). Once you have the right shape, put the helmet and mask on to figure out where the eye holes go. TAKE THE HELMET AND MASK OFF, then cut out small eye holes. Test to make sure they are in the right place, then expand them. Once you have the eye holes correct, duct tape the mask to the helmet (from the inside). Now you can cut from the bottom of the face of the mask to the eyes (along the nose) to open the mask. This will cause the mask cheeks to flare out, so duct tape wire to the inside of the cheeks (see schematic) and bend them back into place.
 Step 4) Paint the helmet and crest. I used a gold paint from Menards that is used to paint frames/vases/etc to make them look fancy. The small sample jar was plenty for me to paint everything I needed (about $3). The helmet I used was shiny plastic, so it took a lot of thick paint to cover. Once I painted the helmet I also painted some details onto the gold paper (note: do not use too much paint or it will warp the paper).
Step 5) Now to add the feathers. Technically I should have used horsehair, but fake feathers were much easier and cheaper. I bought them as trim so that they were already all lined up and I wouldn't have to put them in individually. I cut a groove into the top of the foam board crest from the back to the front and then back again (the trim is too thin if it's a single layer thick). It took a little extra digging to make it wide enough for the trim, but once it was fitted I glued it in. You may need to then touch up the gold paint on the crest depending on how much you have to cut.
All done! More coming soon! For my original DIY 300 Spartan costume, click here. For all costume related items, click here.
See all the Spartan Hoplite Costume articles here!


