For Halloween this year the family is going as some of the Avengers, so I chose Captain America. The sled I used to make this shield was already used once as the shield for my Spartan Hoplite Costume so I needed to repaint it and make new handles. The construction part of this was pretty simple and straightforward, but the painting was a bit of a nightmare; I hope you will learn from my mistakes! I used only materials I already had at home other than the paint, so feel free to get creative with what you have available!
This isn't a movie-perfect recreation but it is a pretty easy process and makes a great halloween costume! You'll notice particularly the shield isn't actually even a perfect circle due to the hand holds in the sled, and the straps are functional (so you can hold the shield with one arm or behind your back) but do not resemble the movie straps. Also it's plastic instead of vibranium so not useful in combat.
Materials:
-Round plastic 'saucer' style kids sled (28 inches across)
-8 D Ring style picture hanging hooks with screws and bolts (small!) to tie the straps
-Fake leather costume material (for hand straps) and leather string (for shoulder straps)
-Metallic spray paint - silver, red, blue
-Plastic Primer **I Didn't Use This But I Should Have!! Please Learn From My Mistakes!**
-Spray sealant (I used Krylon Triple Thick Clear Glaze but that's just what I happened to have at home)
Supplies:
-Power drill
-cloth measuring tape (for measuring the curved surface of the shield and to use as a compass to draw circles)
-painters tape
Step one:
The first step was to drill the holes for the handles and a small hole in the very center of the shield for measuring and drawing circles. Use a bit that corresponds to the screws you will use for the D ring hooks.
There are 2 holes for each of the hand straps and 2 holes for each of the shoulder straps, so a total of 8 holes to drill for these, plus the 9th hole right in the center to help draw circles.
I drilled my hand holes about 5.5 inches apart per strap, and the straps are about 10 inches from each other, roughly centered on the shield (note that the holes from the previous life of the shield (the larger ones in the photo) were offset from center, but for this build I made the straps centered).
The shoulder strap holes are about 15 inches apart per strap, and the straps are about 14 inches apart.
Step 2:
Next I made sure that the screws for my D rings actually would fit, and secured them in place, bolt facing into the shield.
Step 3:
**STOP: This next step is a mistake! I should have sanded and used a PLASTIC PRIMER first, but this was a sled that had already been painted once so I was painting over old spray paint and foolishly thought the base layer of paint was well adhered to the plastic sled (see later steps for why this was so very incorrect)**
Next I spray painted the shield metallic silver on the front and back
Step 4:
Once the shield was silver (and the paint dry) I used the cloth measuring tape (with a nail in the end) to make the circles around the shield with a pencil. The sled is about 28 inches wide (14 inch radius) so it divided nicely into a center circle of 5 inch radius, and then three outer circles each 3 inches wider (8, 11, 14 inch radii). Or if you prefer, the center circle has a 10 inch diameter, the second circle has a 16 inch diameter, third is 22 inches, then the 28 inches of the shield itself).
Step 5:
Next I used painters tape to tape in the center circle and the middle of the three outer circles so I could paint the red layer. To get a roughly 'circular' pattern with linear tape you need to use lots and lots of little pieces. Unfortunately since I didn't use a plastic primer this all went very badly about two steps from now.
Step 6: I painted the outside metallic red
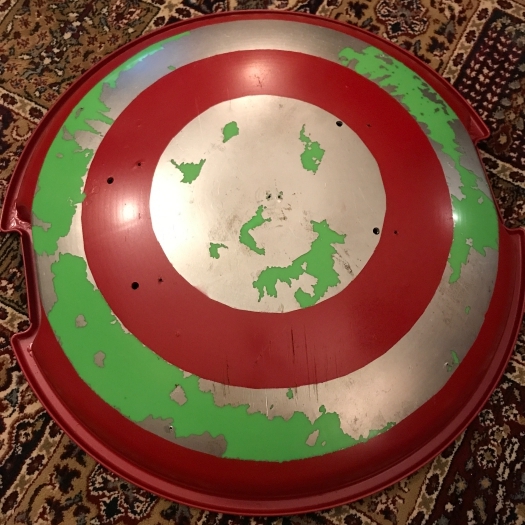
Step 7: I removed the painter's tape and...
Oh nooooooooo! Since there was no plastic primer the paint was not well adhered to the sled, and the silver paint AND the underlying bronze paint from the previous project all came off. Disaster! But the red paint looked great!
I tried a second round of very limited taping to see if I could get better results, but still had to do a LOT of hand touch-ups to get the colors back, and because it was done by hand the colors do not have the full metallic finish that you get when you actually spray the paint. So PLEASE learn from my mistake and use a plastic primer to begin with and save yourself the headache!
Step...8?
Finally having a good-enough red and silver base I attached the D rings to the screws and bolted them in place
Step 9:Now it was time to paint the blue center of the shield. I drew a star by hand by dividing the circumference of the shield into five roughly equal parts and connecting the dots.
Step 10:
Since taping was such a disaster I hand painted the blue onto the shield. This does not look ANYWHERE as good as it would had I been able to tape off the star and actually spray the paint, so don't forget your plastic primer!
Step 11:
Now that I was happy with the paint I sprayed the shield with the clear sealant to (hopefully) keep it from flaking off (though, again, a plastic primer would also have been an important aspect in keeping the paint adhered to the plastic).
Step 12: I cut the fake leather strips for the hand straps and the leather cord for the shoulder straps. I had to play around with the lengths a bit to find what worked best.
And there you have it! Obviously this is not the world's most accurate recreation of the Captain America Shield but I'm very excited to use it for Halloween! And if there's an early blizzard I'm all set!