Sunday, November 28, 2010

Snow Dragon

It's winter! Here's the break down on a giant snow dragon my friends and I made a few years ago during a snow day at college.  My basic idea was to make something which didn't require a lot from the snow.  The entire dragon is supported from below, so it cannot collapse (the base of the dragon is the widest part, and there are no overhanging sections that are not directly connected to the ground).  This all meant that the dragon could be made from relatively dry, non-packable snow, which is what was available.  I made a initial sketch of my idea, and then we started to work.


First we made a huge pile of snow.  Really the dimensions of the dragon were 'whatever we could pile up in a day,' and with four or five of us working we made quite a mound.


Next we compacted the snow a bit, then started the most basic carving.  This meant outlining the wings, head, neck, and base of the tail.


Once the whole basic structure was created, we started on detail carving.  This included the face of the dragon, the tines in the wings, and the end of the tail.

Now with the dragon carved, we added a few accessories.  Large icicles worked as horns and teeth.  We cut spikes out of snow for the back of the dragon by breaking out large pieces of the top layer of compacted snow.  This was possible because we had a large snowfall followed by a bit of slightly warm weather so the top few inches of the snow solidified and broke apart in sheets.   The final dragon is about five feet at the shoulder, not including the spikes.  Tons of fun overall, and a great way to spend a snow-day with friends.

Tuesday, November 16, 2010

How to make Maple Sugar Candy

This came from an original plan to make maple syrup candy (the kind where you heat up maple syrup and pour it on snow), but then Amy and I got more ambitious and we decided to make maple sugar candy instead.  The main difference is that while maple syrup candy is sticky and kind of like really really hard taffy, maple sugar candy is more crumbly and granulated.  The sugar candy is just what it sounds like; the liquid from the syrup has been removed and only the sugar remains.  The whole process took us about half an hour, including set up. 


Ingredients and supplies: Maple Syrup (12oz), butter (1/4 tablespoon), deep pan, wooden spoon, candy thermometer, molds to pour the syrup into to make candy!

Notes before starting: 
-We used a 12oz bottle of syrup, and it made a whole bunch of candy (a little of this goes a long way, it's pretty much pure sugar).  You have to use real maple syrup for this, so we got the cheapest real syrup possible in case it ended in disaster.  I'm pretty sure the quality of the syrup doesn't matter, since you are essentially destroying the syrup and just taking the sugar from it. 
-The pan should be deep, because the syrup will bubble up. In the event you overcook it, there is widespread internet rumor that maple syrup at a rolling boil will pretty much explode all over and be a disaster.
-After looking at many recipes online, I chose 240 degrees F as the average heat to achieve.  If you go too far over this, you will get the maple syrup boiling chaos described above.
-The butter is optional, but is supposed to keep the bubbling down while heating the maple syrup
-Do Not Stir While Heating!!  Maple sugar likes to crystallize when agitated (especially when hot), and you don't want this to occur before you've boiled out as much liquid as possible. 
-A candy thermometer is like a regular thermometer that goes to 300+ degrees F
-We put aluminum foil around cookie cutters to make molds the first time we did this, and it worked alright. The second time I used an actual maple leaf mold.
-Wooden spoons, according to Amy, help keep flavors good.  This might be superstition or witchcraft.
-'Witchcraft' has five consecutive consonants in it; pretty awesome. 

Directions:

1) Pour the maple syrup into a deep pan.  Melt and add a small bit of butter (we used 12 oz of syrup and about 1/4 tablespoon of butter), and gently mix the butter in.  Put your molds somewhere accessible.     

2) Put the candy thermometer into the syrup, and begin heating (slowly!).  The thermometer should not touch the bottom of the pan.  Once heating, do not mix/stir/bug the syrup.   

3) While cooking, you will run into multiple heating plateaus, when the syrups starts bubbling a lot but does not get any hotter.  Be patient, and when the bubbles start to go away, you'll see the heat increasing again. (this is because maple syrup is not an azeotrope ).

4) Once you hit 240 degrees, turn off the heat and move the pan so it can cool.  Let cool for 3-5 minutes, then start stirring vigorously with the wooden spoon.  As you stir, the syrup will become opaque and lighten in color.  After a few minutes it will start getting very thick and viscous, and you will want to pour it into molds (the candy solidifies quicker than you might expect; we started pouring into the molds but had to finish by scraping the sugar out and globing it into the remaining molds).  Let the candy cool, then pull it out of the molds.  Hooray! Candy!

Friday, November 12, 2010

Comparative Vertebrate Anatomy: Vertebrate Skulls


Left to Right: Lizard, Turtle, Crocodile, Bird, Cat

This is a collection of drawings I did based on photos of skulls from my Comparative Vertebrate Anatomy class in college.  One of my favorite classes, and a great area of biology.  Each skull shown above consists of the same bones, just adapted for different purposes.  Had I color-coded each bone, you could see how varied each individual bone can be, but the general shape of the skull conveys the same idea.  

Monday, November 8, 2010

Fall Decorations: Dried Leaf Chains


I first did this last year, and it worked well enough that I thought I'd try again.  There are three basic steps: Find leaves and dry them, coat them in polyurethane, and then string them.  I should note that my strings from last year are still in good enough shape to use again this year.


First, find some good leaves.  I used maple leaves, and got a combination of red, yellow, and orange leaves.  Some of the color will fade, so it's good to get leaves that contrast as much as possible.  I also looked for leaves that didn't have holes in them.  I put the leaves in a big ol' book, and let them sit overnight to dry and flatten out (if you wait about 24 hours, the leaves may crinkle a bit before the end product; if you wait 48 hours you will get a chain of completely flat leaves). 


Next, spray a coat of polyurethane over them (outside, well ventilated, read the warning label).  I use a semi-gloss coating, which I think gives them a nice natural-ish look.  A full gloss could be a bit over-powering, and no gloss means a little less color.  You have to make sure to coat both sides of the leaves, and try not to spray them too much (a light coating is all you need).


Once the polyurethane dries, you are ready to string them up.  All you need is brown (or red or orange or yellow or whatever) color thread and a needle.  I thread two holes in each leaf, about half an inch apart, to make the leaves perpendicular to the chain.  I make chains about two to three feet long; the longer the chain the more difficult to keep it un-tangled, and the leaves are delicate so you don't want to have to mess around with them too much.  Tie off the ends by tying the thread back onto itself in a loop around the end leaf.  Enjoy!

Wednesday, November 3, 2010

Halloween Decorations: Pumpkins and Bats

Along with my Batman costume, I also made some related decorations for the house.

Bats:  I made these bats out of a large sheets of thick construction paper used for making school posters.  It was $5 to buy the 5 sheets of paper, and that was plenty enough for all these bats.  To make the bats I first cut out rectangles about the size of the bats I wanted to make, then folded the paper in half.  I didn't trace or draw an outline for the bats, just started cutting away.  This led to more unique and varied bats, which I think added a nice touch.  The scraps left over from the bigger bats was used to make the smaller bats.  The smallest one is about three inches across, the largest is about two feet.  By starting with the smaller bats at the bottom and slowly making them bigger, it creates the impression of the bats coming towards you (sort of).


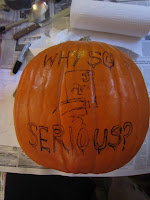
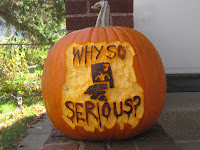
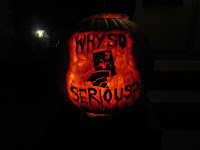
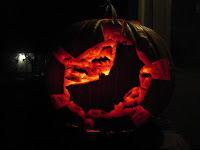
Pumpkins: I'm a big fan of glowing pumpkins, rather than fully cut-out pumpkins.  My two pumpkins are based on posters from Batman Begins and The Dark Knight.  To make the pumpkins, I first draw my design on the pumpkin with permanent marker.  I decided for these pumpkins that what I drew would be the dark space, and everything else would glow.  I then cut an outline (not too deep) around all the lines, and then chopped away just the top layer of pumpkin by digging towards those lines at an angle, to make a little V shaped trench outline around all the images.  From there it is easy to extend the cut-out area.

Next I colored in (black) all the shapes I had drawn.  This is not necessary, but it helps make the images stand out a bit more.
Finally, to make the pumpkins really glow, I scraped away at the pumpkin from the inside.  To make the pumpkin glow, you have to cut out a lot, but not all, of the pumpkin surface.  This is tricky to do from the outside, because you have to be careful around your image.  From inside the pumpkin, however, you can just have at it with a big metal spoon, and easily get the pumpkin wall thin enough for the candles to shine through.   If you want to be really fancy, you can scrape away more or less in different areas to vary how bright different sections are.