Monday, April 25, 2011

Photo List of Plants for Shade Garden

This is a list (with photos) of the plants I used in my landscaping project on the shady hill in front of my house.  Apologies for the bad photos, they are close-ups from larger shots. 

Ajuga reptans:  A nice ground cover.  Has colorful leaves and little blue flowers. 


Astilbe (astilbe chinensis): Has nice bright flowers for a shade plant, in a variety of colors (red, pink, purple, white and possibly others).


Brunnera macrophylla: I have two different types of this; 'emerald myst' and 'jack frost.'  They have nice big leaves with interesting patterns, and help add texture to the landscape.  Also have very pretty little blue flowers in the spring.

Cimicifuga racemosa:  Another good texture addition.  Leaves can be green to dark burgandy. 

Coral Bells (heuchera villosa):  Available in a variety of colors, with varying degrees of shade tolerance.

Bleeding Hearts (dicentra spectabilis): A very bright flowering plant that grows large in the spring but then fades back during the rest of the summer.  Available with green or gold foliage.


Hosta (hosta fortunei):  The standard filler for shade gardens.  They come in different sizes, colors, and patterns, and are extremely hardy and amazing. 

 Japanese spurge (pachysandra terminalis): Another ground cover, this one spreads quickly and is evergreen. 

Thursday, April 21, 2011

How to make Ukranian Easter Eggs: Step-by-Step Pysanky

It's almost Easter again, so I thought I would show a step-by-step of how I made this year's Pysanky (Ukranian Easter Eggs).  For the basics of Pysanky and tips I've picked up while learning, click here.  This year I am re-using dye from last year, by simply adding a little less than a tablespoon of white vinegar to the dye to refresh it (do NOT add vinegar to yellow, gold, or orange dyes, they do not need it and will be ruined). 


First, I drew my rough ideas for the egg on a piece of paper.  It took awhile to plan what all I wanted to have on the egg and the order of how to do the colors.  Remember that with Pysanky, you always draw the lightest colors on first, then get darker, so it takes a bit of planning to make a design.  You can get around this a bit by spot coloring areas with q-tips, but this only works for small areas.  The image on the right shows two quarters of the design.  The green grass runs around the entire design, and the bottom is a sunflower made by connecting the points of every blade of grass to a circle at the bottom of the egg.  The top is a sun (shown completely on the right).

To draw on the egg, I start with drawing vertical lines to divide the egg in four (it's easiest to hold the pencil in one place, and rotate the egg underneath).  Then I continue dividing the egg into 8ths and then 16ths.  Finally I draw horizontal lines to show where I am going to put in specific parts of the design.  In this case, these lines will show me where to put the diamonds that will make the grass in this design.  Remember, you can always erase lines after you dye the egg, but do not erase lines on the egg before you dye or the dye will not stay well.


After drawing in the grass diamonds, I drew a circle around the top of the egg to be the sun.  This was followed with points coming off in four directions, then adding four more points between these.


To make the sun more geometric, I then connected the points along the main edges, connecting each point with the point three away from it (See design schematic).


I then drew the sunflower for the bottom of the egg.  I connected all the points of the grass diamonds at the bottom of the egg, then drew a small circle to make the center of the sunflower.


Next I drew in the flowers.  I gave each flower pattern one quarter of the egg.  I alternated roses (single) and the smaller crocuses (two per section).


Here you can see I started to wax in the designs.  I decided to outline the grass, sunflower, sun, and crocuses in white, which means they all get outlined before I dye the egg.


  I then spot colored the crocuses with purple by dipping a q-tip in dye and then dabbing the crocuses (having already outlined them in wax helps keep the dye from spilling over).  After the dye has been on the egg for a few minutes, I dab the excess dye off with a clean q-tip, then wait for it to dry completely.  Once dry, I cover the dyed section with wax so that it will not get colored when I dye the whole egg.


My first dye color was gold (a strong yellow, essentially).  I dyed the egg for a few minutes, rotating it periodically to make sure every part got equal coverage.  Now that the egg had been dyed yellow, I waxed over the sun (except for the sections I would dye red), waxed over the sunflower petals, and outlined the roses.


I next spot dyed the rest of the sun and the roses, using the same technique as the crocuses.  It was a little tricky to color the roses this way because they are so large, but it still worked (just took a little longer).  I then waxed over these sections, and dyed the egg light green.


Now dyed green, I waxed the stems of the crocuses, and waxed in every-other blade of grass.  The rest of the grass I spot-dyed dark green, then waxed over them as well.

 Finally I dyed the entire egg light blue, but the color wasn't strong enough to cover over the light green, so I also very briefly dyed the egg in regular blue.


Once the egg was finished, I melted the wax with a candle (careful to keep the egg far enough from the flame so the soot coming off the candle doesn't get on the egg, it's hard to get back off!), then rubbed it off with a paper towel.  You can only melt a bit at a time, so it takes awhile.  Once all the wax was off, I erased the pencil lines that were still visible.  Then I coated the egg in polyurethane.  I let it dry on a stand of four small nails, and after 24 hours hollowed out the egg (see my first article on Pysanky for more details on this).  After my first one of these eggs, I made a few more that were slight variations on the original design (such as the one shown in the very first picture in this post).

Tuesday, April 12, 2011

Pet Portraits: Barney

Barney, the clinic cat, who recently passed away.  For more Pet Portraits, click here.


These are the pens I use:

Saturday, April 2, 2011

Identifying bulbs growing in early spring by shoots

It's finally nice enough here to walk around and see plenty of bulbs breaking through the dirt.  Here's a quick guide to identifying a few of the earliest starters, based on my own observations:
(Note, the colors and styles of the blooms will vary! these are just examples)

Click here for photos of some of these blooming!

Order of blooming (roughly - will vary greatly with how much sun and heat the plant gets; shadier plants will be delayed):

Snow Drops - Squill - Daffodils/Hyacinth - Tulips - Allium - Iris - Daylilly


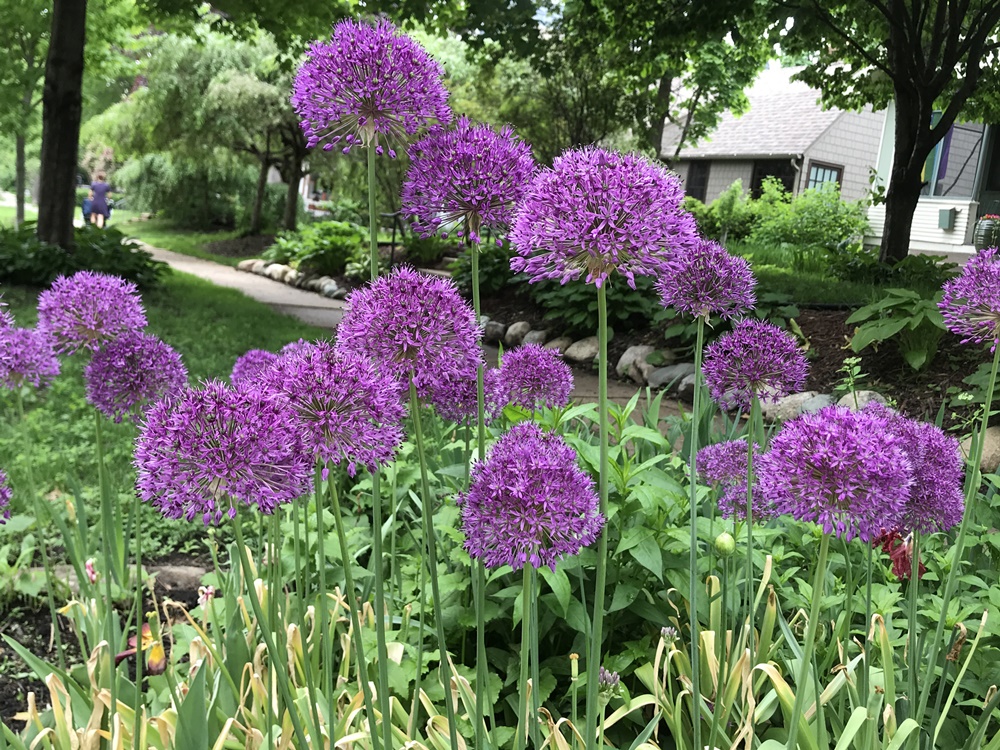
Allium: This is a large ornamental plant in the onion/chives/garlic family.  It has one large bloom per plant, so it's often planted in groups.  The initial shoots have a sort of 'starburst' pattern and they diverge immediately (unlike say a Hyacinth which pops up and then opens).  If you catch them early you might still see a little yellow or red on the tips of the leaves.  There are broader and narrower leafed versions.  Most of the flowers are purple, but some pink and white varieties exist.  These bloom later in Spring, like Irises. 


Crocus:  If you catch them super early, they start out as a small white spike coming out of the ground (this is usually mostly or entirely covered by dirt or leaves).  Once sprouting, they look like small bunches of grass, sometimes with a white stripe down the middle of the leaves.  Frequently you can identify them by the fact that by the time you see them, they are already blooming.  Available in many colors; such as white, purple, and yellow.


Daffodil:  Groups of wide blade shaped leaves that are all parallel to each other.  The groups of shoots grow in pairs from bulbs.  The flower eventually emerges in the center (see far right photo).  Daffodils bloom after the crocus and squill, but often before tulips.


Day Lily: Often you'll find them in big groups.  They can have the same sort of faded appearance that Irises get because they are re-growing from a previous season.  Day lily shoots will have multiple triangular leaves coming off of a central point, but unlike Irises they are wrapped around each other instead of side by side.


Hyacinth: Look like very thick spikes when first coming out of the ground, but very quickly open up as the flowers grow.  They have a similar appearance to Squill that have multiple flowers in a single plant, but are much larger.


  Iris: Very pointy blades growing from a single point, usually look more faded than other bulb leaves (on the right you can see new growth from a bulb that still has the dead leaves from last year attached).  The leaves all grow in a single flat plane.  Iris bloom late in Spring, well after the daffodils and tulips.


Tulip: Many start out red/orange, then become more green as they grow (some even have cool colored veins in the leaves).  They grow as wavy leaves all curving together around a central point.  If you see a tallish spike in your yard, it could be a tulip that hasn't started to unwrap yet.


Siberian Squill: Looks a bit like a smaller, blue crocus (though can have multiple flowers).  The leaves are slightly more substantial and fewer in number than crocus leaves.  Another one that is as like as not to be blooming by the time you see it.


Striped Squill: Similar to Siberian Squill, but white with stripes.  Here you can see the shoots when they are first breaking through the dirt.  With the multiple flowers per stem, they can look like tiny hyacinth.


Snowdrops: Common snowdrops (left) look similar to crocus or squill when first coming up.  Giant snowdrops (center and right) look a little more like curved daffodils.  They will, however, be out in force much earlier in the season. 


Bulb was eaten by a rodent: There is a hole where you planted the bulb.
 
 This happened to all but one bulb that I planted in my front yard, while all my backyard bulbs are fine.  I believe this is because my dog runs around my backyard, and the rodents were smart enough to stay away.  I've also heard that placing chicken wire or similar items over the bulbs can work, because it will keep animals from digging but allow the bulb to grow through it.


Early Arrivals that are NOT bulb plants:
There are quite a few other common early shoots that spring up that can look similar to the above plants but are non-bulb.  Here are a few of them:

Hosta:
Usually in a vaguely circular clump, hosta spikes are, well, spikey.  They look a little like a cross between a tulip and hyacinth spike but they are in groups.  If the leaves from the previous year haven't been cleared out they will also be surrounded by lots of dead leaf material.  They are a little more purple often right at the beginning, then can turn more green or white depending on the type of hosta. 


Peonies:
Peonies also grow in roundish clumps.  Peonies are odd in that they come out of the ground a very striking red color, even though the final plant is green.  They are little frilly red tops on red stalks.


Bleeding Hearts:
Bleeding hearts have a bit of a similar appearance to peonies at first but they get 'frilly' faster and have more leaves instead of long empty stalks.  They also fade from red to green very quickly.


Lily of the Valley
Lily of the Valley are very thin little tubes that grow in spaced out groups.  Unlike the other hosta and peonies etc, Lily of the Valley grow in larger masses because it is many individual root connected plants rather than a single round clump. Lily of the Valley are also much smaller, more delicate looking shoots.


Thanks to Theatrum Botanicum for some of the IDs!