Along with my
Batman costume, I also made some related decorations for the house.
Bats: I made these bats out of a large sheets of thick construction paper used for making school posters. It was $5 to buy the 5 sheets of paper, and that was plenty enough for all these bats. To make the bats I first cut out rectangles about the size of the bats I wanted to make, then folded the paper in half. I didn't trace or draw an outline for the bats, just started cutting away. This led to more unique and varied bats, which I think added a nice touch. The scraps left over from the bigger bats was used to make the smaller bats. The smallest one is about three inches across, the largest is about two feet. By starting with the smaller bats at the bottom and slowly making them bigger, it creates the impression of the bats coming towards you (sort of).
 Pumpkins:
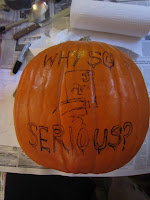
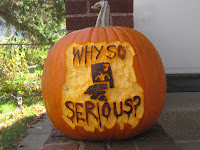
 I'm a big fan of glowing pumpkins, rather than fully cut-out pumpkins. My two pumpkins are based on posters from Batman Begins and The Dark Knight. To make the pumpkins, I first draw my design on the pumpkin with permanent marker. I decided for these pumpkins that what I drew would be the dark space, and everything else would glow. I then cut an outline (not too deep) around all the lines, and then chopped away just the top layer of pumpkin by digging towards those lines at an angle, to make a little V shaped trench outline around all the images. From there it is easy to extend the cut-out area.
Next I colored in (black) all the shapes I had drawn. This is not necessary, but it helps make the images stand out a bit more.
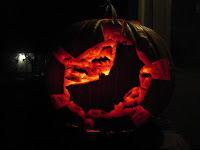
Finally, to make the pumpkins really glow, I scraped away at the pumpkin from the inside. To make the pumpkin glow, you have to cut out a lot, but not all, of the pumpkin surface. This is tricky to do from the outside, because you have to be careful around your image. From inside the pumpkin, however, you can just have at it with a big metal spoon, and easily get the pumpkin wall thin enough for the candles to shine through. If you want to be really fancy, you can scrape away more or less in different areas to vary how bright different sections are.


 Finally, to make the pumpkins really glow, I scraped away at the pumpkin from the inside. To make the pumpkin glow, you have to cut out a lot, but not all, of the pumpkin surface. This is tricky to do from the outside, because you have to be careful around your image. From inside the pumpkin, however, you can just have at it with a big metal spoon, and easily get the pumpkin wall thin enough for the candles to shine through. If you want to be really fancy, you can scrape away more or less in different areas to vary how bright different sections are.


