Tuesday, October 13, 2020

DIY Captain America Shield using Round Saucer Sled

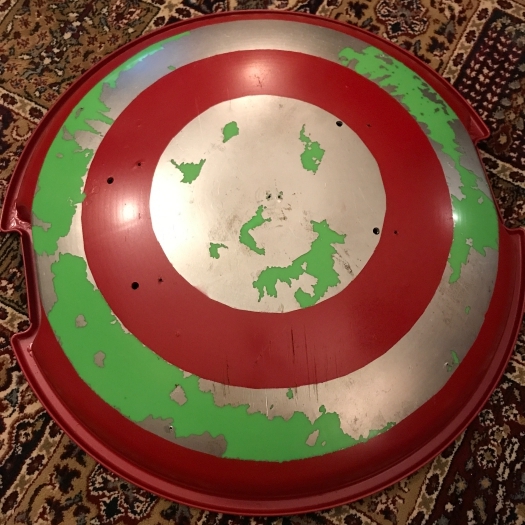
For Halloween this year the family is going as some of the Avengers, so I chose Captain America.  The sled I used to make this shield was already used once as the shield for my Spartan Hoplite Costume so I needed to repaint it and make new handles.  The construction part of this was pretty simple and straightforward, but the painting was a bit of a nightmare; I hope you will learn from my mistakes!  I used only materials I already had at home other than the paint, so feel free to get creative with what you have available!

This isn't a movie-perfect recreation but it is a pretty easy process and makes a great halloween costume! You'll notice particularly the shield isn't actually even a perfect circle due to the hand holds in the sled, and the straps are functional (so you can hold the shield with one arm or behind your back) but do not resemble the movie straps.  Also it's plastic instead of vibranium so not useful in combat.   

Materials: 

-Round plastic 'saucer' style kids sled (28 inches across)

-8 D Ring style picture hanging hooks with screws and bolts (small!) to tie the straps

-Fake leather costume material (for hand straps) and leather string (for shoulder straps) 

-Metallic spray paint - silver, red, blue

-Plastic Primer **I Didn't Use This But I Should Have!! Please Learn From My Mistakes!**

-Spray sealant (I used Krylon Triple Thick Clear Glaze but that's just what I happened to have at home)

Supplies:

-Power drill

-cloth measuring tape (for measuring the curved surface of the shield and to use as a compass to draw circles)

-painters tape


Step one:

The first step was to drill the holes for the handles and a small hole in the very center of the shield for measuring and drawing circles.  Use a bit that corresponds to the screws you will use for the D ring hooks. 

There are 2 holes for each of the hand straps and 2 holes for each of the shoulder straps, so a total of 8 holes to drill for these, plus the 9th hole right in the center to help draw circles.  

I drilled my hand holes about 5.5 inches apart per strap, and the straps are about 10 inches from each other, roughly centered on the shield (note that the holes from the previous life of the shield (the larger ones in the photo) were offset from center, but for this build I made the straps centered).

The shoulder strap holes are about 15 inches apart per strap, and the straps are about 14 inches apart.  


Step 2:

Next I made sure that the screws for my D rings actually would fit, and secured them in place, bolt facing into the shield.

Step 3:

**STOP: This next step is a mistake! I should have sanded and used a PLASTIC PRIMER first, but this was a sled that had already been painted once so I was painting over old spray paint and foolishly thought the base layer of paint was well adhered to the plastic sled (see later steps for why this was so very incorrect)**

Next I spray painted the shield metallic silver on the front and back


Step 4:
Once the shield was silver (and the paint dry) I used the cloth measuring tape (with a nail in the end) to make the circles around the shield with a pencil.  The sled is about 28 inches wide (14 inch radius) so it divided nicely into a center circle of 5 inch radius, and then three outer circles each 3 inches wider (8, 11, 14 inch radii).  Or if you prefer, the center circle has a 10 inch diameter, the second circle has a 16 inch diameter, third is 22 inches, then the 28 inches of the shield itself).


Step 5:
Next I used painters tape to tape in the center circle and the middle of the three outer circles so I could paint the red layer. To get a roughly 'circular' pattern with linear tape you need to use lots and lots of little pieces.  Unfortunately since I didn't use a plastic primer this all went very badly about two steps from now.


Step 6: I painted the outside metallic red

Step 7: I removed the painter's tape and...


Oh nooooooooo! Since there was no plastic primer the paint was not well adhered to the sled, and the silver paint AND the underlying bronze paint from the previous project all came off.  Disaster! But the red paint looked great!

I tried a second round of very limited taping to see if I could get better results, but still had to do a LOT of hand touch-ups to get the colors back, and because it was done by hand the colors do not have the full metallic finish that you get when you actually spray the paint.  So PLEASE learn from my mistake and use a plastic primer to begin with and save yourself the headache!


Step...8? 
Finally having a good-enough red and silver base I attached the D rings to the screws and bolted them in place
Step 9:
Now it was time to paint the blue center of the shield.  I drew a star by hand by dividing the circumference of the shield into five roughly equal parts and connecting the dots.

Step 10:
Since taping was such a disaster I hand painted the blue onto the shield.  This does not look ANYWHERE as good as it would had I been able to tape off the star and actually spray the paint, so don't forget your plastic primer!


Step 11:
Now that I was happy with the paint I sprayed the shield with the clear sealant to (hopefully) keep it from flaking off (though, again, a plastic primer would also have been an important aspect in keeping the paint adhered to the plastic).  

Step 12: I cut the fake leather strips for the hand straps and the leather cord for the shoulder straps.  I had to play around with the lengths a bit to find what worked best.


And there you have it! Obviously this is not the world's most accurate recreation of the Captain America Shield but I'm very excited to use it for Halloween! And if there's an early blizzard I'm all set!


Tuesday, February 4, 2020

Harry Potter Crochet for Absolute Beginners with Free Hedwig Pattern


(to go straight to the Hedwig (snowy owl) pattern just scroll down to the owl picture below)

I've been debating trying out crocheting for awhile and a few weeks ago had a chance to finally start.  This post will walk through the steps I took to learn the basics of crocheting and then make all three of the toys shown above. 

Supplies:  I used an USH8/5mm hook and worsted weight thread (if you haven't bought thread before, basic thread at a craft store often says what size crochet hook to use on the label).  I also in the end used a darning needle (like a sewing needle but blunt for knitting and crocheting) and a stitch marker.  I stuffed the toys with cotton stuffing, but there are many options available.  I used a Yellow/Gold and White thread for the Golden Snitch, a brown thread for the Chocolate Frog, and White, Black, and Yellow/Gold thread for Hedwig. 

My first stop was this Youtube video:
https://www.youtube.com/watch?v=aAxGTnVNJiE
This video shows you how to do a basic stitch and how to weave in yarn ends, which is 99% of all I did to make these! I also did the follow-up tutorial, but I didn't end up using any of those fancier stitches in these projects. 

Next I moved onto my first project, the Golden Snitch.  I used this video for the ball: https://www.youtube.com/watch?v=aAxGTnVNJiE
This video shows you one way to make a Magic Circle which I used for Hedwig a few times.  I made a total of three balls for practice.  I didn't actually end up using the wings shown in the video, instead I made my own pattern by chaining 12, crocheting back down the line, and just going back and forth a few times, slowly decreasing the number of stitches on the far end.  The video does show how to connect the wing to the ball by sewing in the thread using the darning needle (also very useful for Hedwig as it is made of many parts).


Once I had a nice Golden Snitch I moved on to the Chocolate Frog.  I used this video:
https://www.youtube.com/watch?v=ltWGQwgUuZU&t=12s
This video shows you how to slip stitch, which is another technique I used for Hedwig.  To make the frog chocolate I used a brown thread and skipped the plastic eyes but otherwise followed this tutorial.  This was significantly harder than the Golden Snitch, but again good practice for crocheting. 

Once I had my Golden Snitch and Chocolate Frog in hand I set out to find a good snowy owl or Hedwig pattern.  Unfortunately I couldn't find one that was quite what I pictured in my head, so I decided to make one myself!  The directions are below  Apologies to real crochet-ers who know how to read crochet patterns; I do not know how to write them!


Hedwig (Snowy Owl) Crochet Pattern:


A note on phrasing:
-I say ‘Increase’ to indicate crocheting into the same loop twice to increase the number of crochets in a row (some people say ‘2 single crochet’ but I find that can be confusing with doing 2 single crochets adjacent to each other).
-I say ‘single crochet 2/3/4/5/6’ to indicate single crochets in the next 2 spots (or 3 or 4 etc)
-I say ‘Decrease’ to indicate hooking loops in two stitches before yarning over to decrease the number of crochets in a row (so a Decrease is a single crochet covering 2 spaces)
-I say ‘around’ to mean repeat the pattern for a full circle. So if the pattern is ‘single crochet 3, decrease around’ it would mean ‘crochet crochet crochet decrease crochet crochet crochet decrease…’ until you’ve made it all the way around the circle.

Supplies: H8 Crochet hook, worsted weight yarn in White, Black, and Gold/Yellow, Polyfill or other stuffed animal stuffing, stitch marker, darning needle, scissors.

Owl Body - I used white worsted weight yarn. The pattern starts at the bottom of the owl and works upward. I use the stitch marker to keep my place so I don’t go more than a full circle (if you are very good at counting and paying attention you don’t have to have one, but I’d recommend it if you are easily distracted like me).


To start: Magic circle 6

Increase (add 2 single crochets to each) all the way around (total 12)

Single crochet, Increase around (total 18)

Single crochet 2, Increase around (total 24) (it should be a pretty flat circle still)

Single crochet around (24 still). The form should start to bend up

Single crochet around 10 more times to build up the body (still 24)

Single crochet 2, Decrease around (down to 18) (starting the neck)

Single crochet 4, Decrease around (down to 15)

Single crochet 4, Increase around (up to 18)

Single crochet 2, Increase around (up to 24)

Single crochet around 3 times to build up the head

Single crochet 2, Decrease around (down to 18)

Single crochet, Decrease around (down to 12)

**add stuffing at this point**

Single crochet 2, Decrease around (down to 9)

Single crochet, Decrease around (down to 6)

Loop one and break off a long thread (extremely long if you want to make an eyebrow ridge with the same piece)


Wings (make 2)

Chain 6

turn and single crochet back down the line (5)

chain 1 and turn

single crochet 4, then Increase the last one (6)

chain 1 and turn

single crochet down the line (6)

chain 1 and turn

single crochet 5, then Increase the last one (7)

chain 1 and turn

single crochet down the line (7)

chain 1 and turn

single crochet 6 then Increase (8)

chain 1 and turn

single crochet down the line (8)

single crochet 7 (leave the last one) (you will start to make a ‘step’ like effect)

chain 1 and turn

single crochet 6, then Increase the last one (8)

chain 1 and turn

single crochet 7, then keep stitching over the right angle bumps until you get back to the original starting line (see image).

Loop one and break off thread. Leave a long end so you can sew the wing to the body. Do NOT sew the wings on until you have added the black markings! 


Black markings on wing:
Put black thread on a sewing needle. Go through wing from inside to outside, go down one stitch and go through to inside again, come back out the original point and go down one stitch 90 degrees away, then go through to inside and tie ends together (see image).

Note that one wing is a Left wing and one wing is a Right wing so the 'inside' and 'outside' of each wing you made are opposites; don't accidentally stitch the markings on the same side of each wing!

Once you have your markings finished, use the darning needle to sew the wings onto the body. Depending on your preference you can sew along the full edges of the wings (to keep them close to the body) or just the front edges if you want them to be able to flap a bit, or somewhere in between! I use the term ‘sew’ loosely; I just run the needle back and forth between the wing and body with reckless abandon, there is probably a more correct way but I’m very much a beginner!


Feet: You are making an ‘X’ essentially. (make 2)

Chain 5

Slip stitch back 3

Chain 4

Slip stitch back 3

Single crochet into center

Chain 4

Slip stitch back 3

Single crochet into center

Chain 4,

Slip stitch back 3,

Chain one and break off a long thread


Talons: Use black thread on a needle, tie a knot around the end stitch on each toe and then pass the thread through over and over (covering the knot) until you have a nice talon, then tie the end of the thread to the thread from the knot (at the BOTTOM of the toe so it's hidden)

Use the darning needle to sew the feet to the body.


Eyes (make 2): The eyes are a black center with a yellow/gold rim and a single white line for a ‘reflection.’

Magic circle 4 with black thread. With yellow/gold yarn do a single crochet then chain 1 around the circle (you can either tie off the black thread and then start again with yellow/gold or just link the thread together if you know how to do that). Chain one and break off thread once you've gone all the way around.
Use a piece of white thread on a needle to make a short loop and tie at knot behind the eye to make the 'reflection' in the eye (see picture). I left very long threads for both the black and yellow because sewing the threads back in can help hide mistakes. I used the yellow thread to actually attach to the head.
Use the darning needle to attach the eyes to the body. Note that you are using yellow/gold thread to attach so it will show up if you sew away from the eye.


Eyebrows: These are sort of unnecessary but I felt like trying to make them. Snowy owls have pretty smooth dome heads so feel free to skip this if you like how your owl already looks without them!

I used the *very* long thread I had left from the top of the head and used a darning needle to stick it back down and out next to the left eye. I then crocheted 5 from the side of the eye to not quite the center of the forehead (you don't want the two eyebrows to touch). Hook one, turn, and stitch 5 back down the line so you have an eyebrow that is 5 crochets long and 2 crochets tall. Thread the darning needle and move over to the other side and repeat. Once finished hook one and break off a very long thread. I used the thread to then sew the eyebrows back so they turned into smaller ridges above the eyes, but if you like the more stronger brow-ridge look then leave it at that!


Beak: Thread black onto a darning needle. Thread across the stitches between the eyes and tie a knot. Loop through over and over to cover the knot; let the strand from the knot fall down the face, and loop over this as you make your way down the beak. Progressively make smaller and smaller loops, and then tie the end to the knot thread. Use your darning needle to bury the end of this new knot thread back up and under the beak. 
 
All done!


Saturday, December 21, 2019

DIY Hogsmeade Christmas Village: Madam Puddifoot's conversion and Ice Skaters


DIY Hogsmeade Christmas Village

Previous Hogsmeade Christmas Village Posts:

DIY Hogsmeade Christmas Village: Ice Skaters and 
Madam Puddifoot's Tea and Cakes

My latest additions to the DIY Hogsmeade Christmas Village are a few ice skaters and Madam Puddifoot's Tea and Cakes!

I followed my same basic strategy for these as I have for the rest of the village:
1) Paint solid white
2) Paint in solid colors for major details
3) Do a black 'wash' of very water paint to fill in shadows
4) Dry brush on lighter colors for highlights

Most of the figures and accessories I get are from the Lemax line christmas village.  The stores and houses I purchase at thrift stores (usually not in boxes, so the brands are unknown).

Ice Skaters:

There were two pairs of skaters that came with my set; a couple and a child pulling a sled.  I made the couple a Slytherin and a Gryffindor, and the child is a Ravenclaw.  These figures are slightly smaller than the singers I painted previously, so I wasn't able to put as much detail into their faces.

Ice Skaters conversion

Skating child and dog conversion


Madam Puddifoot's and two carolers

Madam Puddifoot's Tea and Cakes:

I used the same color scheme as the previous buildings to keep the village matching.
Dark grey roof, light taupe brick, tan for the chimney and covered walls, burnt umber for the woodwork, a dark green for the garlands, and I used purple for the windows.  The green woodwork is a lighter green than the garlands. 
This store had a big front window display, large enough to paint, which was quite a bit of fun.  The display had some carved aspects to it, however, which limited my options for the display.

Madam Puddifoot's conversion

The original sign had a large teddy bear sculpted onto it.  I used plaster of paris to cover over the sign, then sanded it down once dry.

You can see the carved string of lights and christmas tree in the display window.  


After painting the purple window frame, I did a very light yellow wash to give the windows a little warm glow.  Then I colored in the window display the way it's carved, but added an extra cup of tea and a cupcake, since it is supposed to be Madam Puddifoot's Teas and Cakes, afterall.

For the rest of the building, as before, after the first block coloring dried (it took a couple coats of most of the colors) I did a black wash by diluting black paint in water and letting it seep into all the cracks and crevices to help accent the shadows.  Then I took lighter versions of all the colors and dry brushed the highlights (for the roof I just added white to the gray to make the lighter color, for the woodwork I used a golden brown to accent the burnt umber).
Madam Puddifoot's in the Hogsmeade Christmas Village


Sunday, November 17, 2019

DIY Hogsmeade Harry Potter Christmas Village: House Choir Singers

Ravenclaw, Hufflepuff, Slytherin, and Gryffindor singers in the Hogsmeade Christmas Village!
See the original Hogsmeade Christmas Village post here!
See the Owls of Hogsmeade Christmas Village post here!
See the Dog Walker Conversion for Hogsmeade Christmas Village post here!
See the Madam Puddifoot's Conversion for Hogsmeade Christmas Village post here!

My latest addition to the Hogsmeade Christmas Village is a set of singers.  I couldn't find any pre-made Dickensian singers in wizard robes, so I painted the old timey clothes in the house colors for Gryffindor, Ravenclaw, Hufflepuff, and Slytherin.  I didn't fully stick to the straight house color pattern; each one got a little extra Christmas flare for the season. 

I purchased a set of 4 figures that were pretty roughly painted.  I didn't do any edits to the actual figures this time, just repainted everything.  First a coat of white paint, then block coloring the clothing, then dark washes.  I used a black wash for the clothing and a dark brown wash for the skin tones.  For a few areas I then also did some highlight dry brushing of the original color. 

Gryffindor Singer Painting
Hufflepuff Singer Painting

Ravenclaw Singer Painting

Slytherin Singer Painting

The faces were a little more complicated.  A sold block color of skin tone, then a dark wash.  Next a tiny dot of white for the eyes, then an even tinier drop of brown or blue for the iris! I then did a little dry brushing of the skin tone again and red lips for Gryffindor.
Gryffindor Singer Face Painting
Harry Potter House Singers in the Hogsmeade Christmas Village