Saturday, December 19, 2020

DIY Hogsmeade Christmas Village: Dog Walkers Conversion

This year it's been a little harder to go to second hand stores for old Christmas Village supplies to repurpose, but I did get a pair of Lemax Christmas figures to paint.  Like my previous figures, I painted them in colors to correspond to one of the Hogwarts Houses, in this case Gryffindor and Slytherin.  

Previous Hogsmeade Christmas Village Posts:


The painting system I use is simple; first I paint the figures white, then I block colors for each section.  For Slytherin I used greens, black, and silver primarily.  For the Gryffindor I used reds, browns, and gold mostly.  The red jacket is a different color (Santa Red) than the red sweater (Burgundy).  Next I do dark washes with either black (for greens/grays/silver or dark brown) or dark brown (for reds and lighter browns) paint diluted with water.  Finally I do highlights by dry-brushing light colors onto the trim/edges.  So for example the yellow dog is a honey brown base, a dark brown wash, then a honey brown-mixed-with-white drybrush to highlight the fur.  


The fine details came last; the eyes, nose, and collar are all just solid colors.  It's hard to paint the fine details, but for example for the eyes it was easy to just dap the area brown and then re-paint whatever spilled onto the fur.  For the eyes I did small white dots, then very very small brown or blue dots.  Having a very fine tip brush is key! I painted the bases white last, since I knew I would be spilling paint on them constantly during the process.      


Wednesday, December 16, 2020

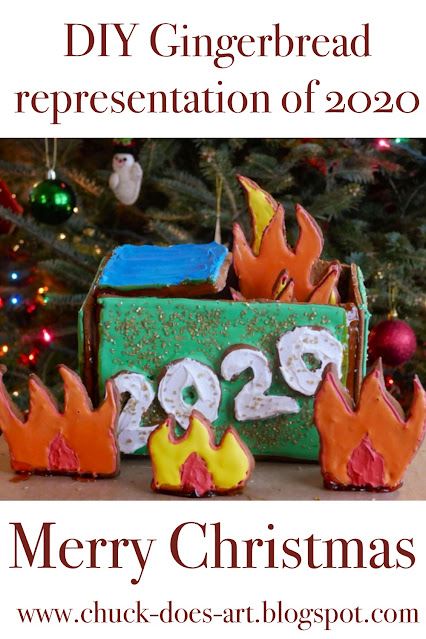
The Official Gingerbread House of 2020 (Dumpster Fire)

Well it has been...a year.  So to commemorate we made a gingerbread house that fit the mood.  All credit to Amy for the idea and baking and decorating and putting up with me through all of 2020.    Can't wait to actually set it on fire.  
**Scroll to bottom to see it ceremonially burned on New Year's Eve!**


This is a rough diagram of how I made the gingerbread pieces.  The front (h) and back (H) of the dumpster are different heights, which means the lid of the dumpster has to be as long as the angled top of the sides (A).  If you want to keep it simple, make the front and back of the dumpster the same height.  We made the lid 1/2 the width of the dumpster (1/2 W), which meant the flames had to be a little less than 1/2 the width of the dumpster to make sure they would fit in once the lid was on.  I made some of the flames taller than the back (H) and some were between the front and back heights (H > flame > h) Not included in my cardboard cut outs are the little right-angle triangles that I made to go behind the flames in front of the dumpster so they wouldn't fall over. 


We cut the pieces out in a very hard gingerbread (find a recipe made for construction, not cookies), and made a couple extra pieces in case some broke.  Once baked, we piped royal icing around the edges, then flooded the surfaces, and added gold sprinkles for the dumpster sides.  The '2020' is made of hand-carved gingerbread pieces that we coated in white icing and placed onto the front of the dumpster after flooding it but before the icing hardened.  You could also just flood the front, let it harden, then pipe '2020' onto it.  


We previously had a disaster trying to make a gingerbread house stand up using royal icing as mortar, so this time we used caramel.  It was Super adhesive, though also Super Hot and Super Will Burn Your Skin so be careful! I used the little right angle pieces to act as braces behind the flames that are in front of the dumpster, but they might be able to stand up on their own without that.  The whole thing is adhered to a piece of cardboard, which we left undecorated for full Dumpster feel.  


Then, on New Year's Eve, we said goodbye to this dumpster fire of a year.  If you've ever wondered 'could a gingerbread house burn down a real house?' The answer is yes, absolutely.  These burn Very Well.