Sunday, October 27, 2019
Healthy Halloween Snacks: Bell Pepper Pumpkins and Krakens
There are lots and lots of sweet halloween treats and decorations available, but we recently hosted a halloweeny brunch and we needed some savory options. These bell pepper creations were super quick and easy to make, but had a big visual impact. They are pretty much as easy as they look!
For the pumpkins, carve the pumpkin faces before you cut open the pepper; if you cut it open first it will be less structurally sound and a little harder to carve. Once you have the faces complete, cut the top off and empty the insides. You can also put dip inside the pumpkins if you feel the urge.
The Kraken eye is a circle with an ellipse on either side. Again, carve the eye, then cut the top off and flip it upside down. It's hard to see from the picture but the Kraken is sitting in blue ranch dip (I just used a few drops of blue food coloring).
There you go; all ready for a spoooky brunch!
Wednesday, October 23, 2019
DIY Hogsmeade Harry Potter Christmas Village: Owls!
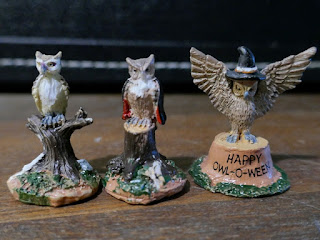
As the first addition to the Hogsmeade Christmas Village, I converted some Halloween Owls I got on sale into wintry Harry Potter owls. It was actually a bit easier than expected; I used a dremel drill to remove the 'Halloween' aspects of the models, then simple acrylic craft paints to repaint them.
The owls, as seen above, had a few items that needed to be removed in order to convert them to Wintry Wonder. I dremeled off the spiders, rats, halloween mask, and the high collar of the dracula cape. I didn't dare remove the entire witch hat or cape, as it would have required sculpting a large piece of the owl. I used light strokes with the drill to make new 'feather' imprints below the areas where I removed things.
 |
| The original owls before the dremeling |
 |
| Owls after dremeling |
Next I started adding color. The non-caped owl I gave darker brown wings/head/back with a lighter belly. The caped owl I painted a more orangish color for variety (the cape I painted green). The hat owl I left white, to make a snowy owl a la Hedwig. The tree trunks I painted a dark brown, with a lighter brown for the cut surfaces.
From here I began doing layers of dry brushing and washes.
Washing is taking a darker color paint and diluting it with water. Take this and paint your item, allowing the watery paint to seep down into the crevices of the item. This will help accent shadows. Generally I use black paint for washes, but occasionally other dark colors if it will fit in better.
 |
| A very light Black wash in Hedwig's wings |
(For the eyes, I did golden yellow, then very tiny black dots on top for pupils. It was surprisingly difficult to get the pupils to face the same direction!)
Dry brushing is when you use a lighter color paint, put a small bit on a brush, then remove most of it on a piece of newspaper or paper towel. Then very lightly paint with the brush so that only the top bits of the surface (the highlights) receive paint. Typically I do a wash first, then a dry brush once it has dried. If you do a wash over a dry brush it will darken the highlights a bit.
 |
| Brown owl with lighter brown dry brush on the feather edges |
For Hedwig, I needed to convert the witch hat into either something Christmasy or Harry Potter-y. I decided to paint her wearing the Sorting Hat. The hat was light brown, and I added eyes and a mouth with a darker brown paint. I then did a dark brown wash to give it better depth and texture.
Wednesday, October 16, 2019
DIY Wooden Train Track Accessories
 My child has been building a wooden train set and I decided to try my hand at building a few accessories for the tracks. We use the generic wooden tracks that are compatible with Brio et al (mostly we use the IKEA Lillabo sets; great price) but they work with the Thomas The Train engines which my child adores. I've heard a rumor that the official Thomas tracks don't link to the Brio et al tracks without adaptors, but I've not tried them myself. Either way, the trains all work on any of the tracks.
I made three different items; a Water tower with track, a Helicopter landing bridge, and a Buffer.
I used generic wood slats and rods from a craft store to make the structures, plus a wooden bead for the water tower. I glued them together with wood glue, sanded them a whole bunch, painted them with craft paint, then gave them a coat of semi-gloss polyurethane.
For the painting, I used blue painters tape to cover the bases so they could stay unpainted. I painted the rest white, then added the highlight colors as needed.
Helicopter Landing Bridge:
Buffer:

Water Tower:
via GIPHY
Subscribe to:
Comments (Atom)


