Saturday, December 31, 2016

DIY Cigar Box Travel Board Game

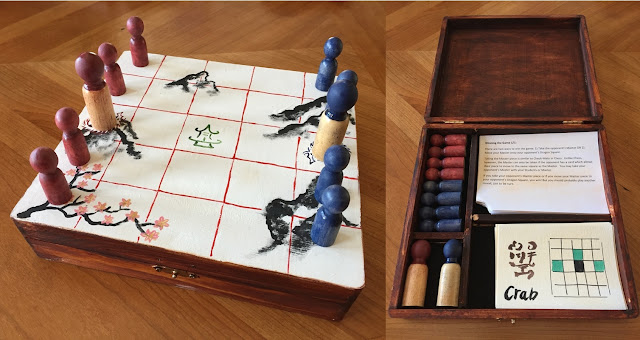
For Christmas this year I made my brother a travel version of a board game I really like.  I used a balsa wood cigar box from a craft store, and little wooden dowels as pieces.  The board is painted on the top of the box, and the inside holds the game pieces, cards, and instructions.

This is a general outline for making a board game.  You can use this to make a wide variety of games which require a relatively simple board.

Supplies:
-Balsa wood box
-Acrylic craft paint
-White craft glue
-Balsa wood strips
-Felt
-Wooden dowels (for game pieces)
-Wood stain
-Polyurethane (I used glossy)
-Water colors and water color paper (for game cards)
-Card stock (for printing instructions)

This project took awhile to complete.  The paint, wood stain, and polyurethane all need to dry for long periods of time, so make sure to plan ahead!  There is a list of mis-steps I made listed at the end to help your project go smoother.


Step one was finding supplies.  The box itself I chose because it was roughly square (the shape of the board) and shallow, which meant it wouldn't take up too much space.  I knew I needed two types of pieces for the game, so I bought large and small finished dowels at a craft store.  I also wanted to be able to partition off the inside of the box, so I needed some strips of balsa wood (same material as the box itself).


To frame the inside, I placed the pieces and cards into the empty box. I then cut out balsa wood segments to contain the pieces but still leave room so they can be picked up easily. I glued them down with white craft glue. See 'Things I should have done differently' (below) regarding balsa wood height!


Next I painted the board*.  Originally I had planned on painting the inside of the box as the board, but it was a pretty small space, and would have made playing the game frustrating.  Next I tried painting the top of the box but leaving an edge around the board.  This ended up still being too small of a board to be easy to use.  In the end I used the whole surface of the box top for the board to maximize space.  The top is painted with acrylic craft paint.  I drew the lines for the board after the underlying design was finished.  The bottom of the box I painted a solid white for symmetry.


*This was the wrong order; you should stain the box first! See below, and avoid my mistakes!


The pieces are colored with the same acrylic paint.  Because the pieces were already finished when I bought them, they did not take paint well.  The smaller pieces were semi-finished and so the paint ended up staining them in an interesting way.  The larger pieces were heavily lacquered, so paint did not stick to them at all.  I ended up dipping the tops of the large pieces into paint, which made for a solid shell around their tops.  The large and small pieces were then coated in polyurethane to protect them.


The inside and outside edges of the box were finished with a dark wood stain.  I unscrewed the hardware from the box prior to staining to keep it clean.  Once the stain was dry I then coated the inside and outside of the box with 2 coats of polyurethane.  See below regarding polyurethane and craft paint!


Once the polyurethane was dry I used felt in each compartment to reduce wear and tear on the pieces (and make the game quieter to carry around).  The felt was glued down with the white craft glue.


The cards used for the game I painted on water color paper which I had cut into 1/8ths.  First I did a very light brown watercolor wash over the entire card to give it a slightly aged look, then I drew the grids in ink.  I finished by watercoloring the name and squares.

The instruction cards I printed on card stock.  I cut out a small quarter circle in each corner to make them easier to pick up from inside the box.

And that was it!  I'm quite happy with how the box turned out, and the play-testing was a success!


Things I realize I should have done differently: 
1) The balsa wood pieces I used are too short, which allows the contents of the box to move around if the box is not kept upright.
2) The acrylic paint I used became slightly translucent with the polyurethane, so in some places you can see the original smaller board outline peaking through the white paint.
3) Staining the box is super messy! Do it BEFORE you paint the box or you will be doing Lots of touch-up work!

Saturday, November 12, 2016

DIY: Grow your own Pineapple plant

So about 3.5 years ago I was wondering if I could make a new pineapple plant from the top of a pineapple I had bought at the grocery store.  The answer, it turns out, was Yes.  It actually wasn't very hard, and now I have an enormous pineapple plant in the apartment.


I will note that my Pineapple has yet to flower and produce a new pineapple, but as I live pretty far north and do not really go out of my way to get it enough light I am not too surprised.  Mostly my pineapple plant just hangs out as an enormous bromeliad.

What you will need:
A pineapple
A glass of water
A pot of soil
2 years (or more)


Step 1: Buy a pineapple.  Make sure the leaves on top are green.  I've never seen a pineapple that didn't look like the leaves looked at least moderately healthy, but I assume it's possible.


Step 2: Cut the pineapple's top off.  Cut right where the leaves exit the fruit, or a bit lower.  


Step 3:  Take the top and slowly cut thin layers off until you see root nubs.


Step 4: Once you see the root nubs, start removing leaves from the base.  I removed about an inch of leaves total.


Step 5: Now that your pineapple top is ready, let it dry for 24 hours.  This is to prevent rot.  I cannot actually remember if I did this step (it's been 3.5 years), but it's what you are supposed to do.


Step 6: Place the top into a glass of water so the root nubs are submerged but the leaves are above the water. Put the glass somewhere it will receive light for the next 1-2 weeks.


Step 7: Watch the roots slowly grow.  It took about a week or so for the roots to grow to be an inch long.


Step 8:  Once the roots are an inch or so long, take the top out of the water and Very Gently plant in soil.  I just used the random garden soil I had lying around.


Step 9:  Place in a southern facing window and water regularly, but don't keep it soaked.  If in doubt the pineapple will do better with a little less water than too much.


Step 10: Slowly give up more and more of your house or apartment space to the monster you have created.  Mine is currently 4 feet across and harassing all the other house plants on its shelf.


In theory a pineapple can start to flower and bear fruit after ~2 years,  That has not been the case for me and I believe it is due to sub-par lighting, but it is still very much alive and kicking, so I have my fingers crossed that one day I may yet get a second pineapple from my original purchase.

Sunday, October 30, 2016

Dragon Pumpkin

This year's pumpkin carving used a new tool; the 1/4 teaspoon! I used it to ridge edges along the skin and then scraped away at then to make a bit of a curve and give extra dimension.  Overall pretty happy with how it turned out!
See all the pumpkin posts here


 Detail on the fire: It's supposed to be a new, smaller dragon emerging from the flame...it's not perfect...


Saturday, July 23, 2016

Wedding Centerpieces: DIY Rustic Terrariums with subtle Nerd Accents (Star Wars Terrariums)


I was recently asked (allowed, more like) to help make centerpieces for one of my best friend's wedding.  We made simple glass terrariums and accented them with some rustic wood slabs and moss, and LED lights.  As a finishing touch we added Star Wars Micro Machines, because we are adults.


The terrariums are very simple and not really made to last very long.  We put them together two nights before the wedding and they still looked great for the wedding, but their long-term prospects are likely not great.  The glass jars have no drainage, so plants that don't do well with humidity (particularly cactus and succulents) are unlikely to do well long term.  BUT they looked fantastic for the evening!


Supplies: 

Terrariums
-Clean glass jars
-Garden dirt
-White pebbles
-A variety of small plants (flowers, succulents, cacti, etc) in 2" plastic pots (adjust size to fit size of jar)
-Accoutrements: Sea glass pieces, twigs, Star Wars Micro Machine toys, etc

Accents
-Oak slabs
-Dried moss (varying types/colors/textures)(they sell 'sampler' bags at Michaels which work well)
-20ct LED copper wire starry light strings (one string per centerpiece)

To make the terrariums:
   1) Take the plant out of the plastic pot and break up the root ball.  If the pot was particularly tall you may need to simply remove the bottom 30-50% of the roots.  Place the plant in the jar.
   2) Add dirt around the plant until the roots are covered and the dirt is level at the base of the plant.  Shake gently to get dirt off the leaves and evenly spread.
   3) Carefully add pebbles around the plant until the dirt is covered.
   4) Add toys as desired.

Again, we made our Terrariums 2 days in advance and they looked great, but these aren't really designed for long-term survival of all types of plants.   We gave the plants a VERY light watering after we put the terrariums together.  Leave the lids off if possible until the event to let them breathe and get rid of excess moisture. 


 To put together the Accents

1) Place the Terrariums on wooden slabs
2) Unwind the LED lights and wrap them around the terrariums; they don't need to be wound tightly, just keep them nice and loose
3) Cover the LED battery pack with a large piece of moss.  Add additional types of moss around the edges of the terrarium on the wooden slab to further hide the wire for the LEDs

This process will get dirt and moss bits on the linens; you can use the edge of a credit card to clean off the debris.  


 Congratulations! Your wedding is now beautifully nerdy!

Sunday, June 5, 2016

The Campbell Sisters Dancing by Lorenzo Bartolini

My first two-figure painting.  16x20 acrylic.  Complete with traditional unnecessary Tuscan countryside background and Botticellian flowers.

This painting is based on Lorenzo Bartolini's statue 'The Campbell Sisters Dancing the Waltz' ('"Gruppo delle sorelle Campbell in atto di ballare il Valzer").  Looking at the plaster model used for the sculpture I thought they were walking, and made my background accordingly; only later when researching the sculpture did I find out they are in fact dancing! Oops.  Sotheby's has a nice write up on the history of the statue here.

Placing religious moments and Bible scenes in the Tuscan countryside was a strong tradition during the Italian Renaissance, so I thought I would give it a try.  I've been trying to find a Greek myth to attribute this moment to but haven't found one yet (most Greek myths, like Bible stories, took place in the Tuscan countryside, according to Italians in the 1500s).

Friday, May 27, 2016

DIY Dining Set Makeover


Re-finishing a table and chairs, or How I learned to hate chairs.

After

We were recently given a table from the delightful Moira Katson, writer extraordinaire, and decided it would be a great opportunity to put all of our years of HGTV watching to use.  The table had a very dark finished veneer, and many years of love and use had left it a bit worn.  After perusing many, many photos of tables we decided to re-finish the top of the table in a lighter wood color and paint the legs a distressed white. Painting the bottom of the table turned out to be an excellent decision, as it is far less work to prep a table surface for paint than it is to re-finish a dark veneer into a lighter color. Sanding and painting the chairs also required less waiting time than refinishing the table top, but sanding and painting every single surface of an entire set of chairs will leave you cold and dead on the inside.  Just saying.  

Note: Most of our steps were determined by picking up the item we liked in the store (such as wood stain or paint) and reading the can for directions and tips on how to use it and then how to seal/finish it (both the stain we bought and the paint we bought came with suggestions for a second product to finish them with, so we just followed along humbly).  Be sure to follow any safety instructions the products list.

1)      Re-finishing the surface of the table:

First we tried to strip the veneer using a chemical stripper.  This was as misguided as it was unsuccessful.  The chemical stripper just removes the lacquer or protective sealant over the top of the veneer; not the veneer itself.  What we *actually* wanted to do was remove the sealant and the top dark stained part of the veneer, leaving the lower un-stained portion of the veneer to be re-finished.  In the end the chemical stripper wasn’t even enough to remove all the sealant, so it didn’t matter anyways.
 
Chemicals having failed us, we next moved on to power sanding.  This turned out to be an excellent plan.  Be sure to use proper protective equipment! We used a 120 (‘Fine’) grit and with a few hours of elbow grease we sanded off the sealant and then down through the stained aspect of the veneer.  Fortunately for us, the veneer was thick enough that the dark stain only penetrated part of it, and beneath that there was still light colored veneer covering the plywood table.  


Left: a failed chemical removal.  Right: Power sander glory


As we sanded deeper through the stained veneer, the color gradually lightened until the raw veneer was exposed.  Different areas of the table had stain that penetrated deeper, however, so there were some areas that stayed darker than others.  You can keep sanding deeper in sections where the stain penetrated further down, but you risk an uneven surface and going all the way through the veneer and exposing the plywood below.  We might have done that a few times.  Don’t tell anyone.  

Here you can see the layers of stain as it was sanded through

Sanding done, the next step was to wipe off the dust with paper towels, then a finishing wipe with tack cloth (sticky cloth that picks up any remaining dust). 

 The raw veneer was fortunately a very light tone

To re-stain the table, we used a gel stain which was a bit darker than the raw veneer (but far lighter than the original stain).  The gel stain is spread onto the surface of the wood, then the ‘excess’ is wiped off with clean cloths after about 3 minutes.  This is slightly trickier than it sounds, because you have to wipe off evenly or you will get some areas that are more heavily stained and splotchy, and if it dries too much you cannot wipe it off.  If you really mess up (which we did in a couple spots) you may need to re-sand an area (by hand is enough to take off the extra color) and re-stain.  


The stain required 24 hours before we could seal it with polyurethane.  The polyurethane was then applied over the entire table top.  The polyurethane had to set for about half a day before we could lightly sand it and apply a second coat (note; sanding the polyurethane looked like we were destroying it, but the second coat made it all pretty again).  24 hours later the polyurethane was set and the table top was done!  If by chance you are applying polyurethane in a garage, make sure one section of the table isn’t in direct sunlight and 15 degrees hotter than the rest of the table because the polyurethane will dry unevenly and you will have to re-do it.  I mean, a friend told me that.  


2)      Refinishing the table legs and base

While all that was going on with the table top we were also re-finishing the rest of the table.  We lightly sanded the legs and base of the table by hand (to help the paint to stick to the veneer), then once again paper toweled and tack clothed the surfaces to remove any trace of dust.  We painted the base and legs with two coats of a chalky white paint.  Our plan was to hand distress the table anyways, so we weren’t too picky about painting it perfectly. (Note; some paints are made to be distressed, so if you are interested in distressing an item make your life easy and chose a paint made for the job!).

                                                  We put the legs back on before painting

Once the paint had dried for 24 hours, we distressed the surface using sand paper.  Focus your distressing in areas that naturally get bumped and chipped over time; corners, edges, places where chairs bump the table, etc.  Start small; you can always add more distressing, but if you go too far you have to re-paint.  


Once we were happy with our distressing, we cleaned off the dust again and we sealed the paint.  The paint we chose recommended Miniwax as a sealant, which was a new experience for me.  It is literally a wax that you rub over all the painted surface with a clean cloth, and allow to dry for a few minutes.  Once dry, you go over it again briskly with a clean cloth to polish it.  The polishing part worked pretty slick, but be prepared to have your hands very waxy during the initial application.  Actually, be prepared to have everything you have ever known be covered in wax.  But really, it gets all over your hands.  Maybe a smarter person would have worn gloves.    

3)     Refinishing the chairs

We had 4 old wooden chairs (mis-matched) which we wanted to use for this table.  As the chairs were not stained the same as the new table top, we knew we would need to give them an update to make the dining set work.  As the chairs were pretty cheap to begin with, we did not think it would be worthwhile to try to refinish the wood to match the table top. Instead, we decided to paint them in the same distressed chalky white as the rest of the table.  


The process for refinishing the chairs was the same as the table base and legs: sand, clean off dust, paint, paint again, distress, clean off dust, seal.  Here’s the thing; chairs are way more annoying than tables.  Tables have large, flat surfaces.  Chairs have a million little rounded edges and ledges and corners.  It takes much longer to sand, clean, paint, and seal a chair than a table.  And there are So Many Chairs. 


                     From the top: Sanded but not cleaned chairs, Painted chairs, Distressed chair

Once the chair purgatory was over we went and bought new cushions.  We continued our not-quite-matching scheme and got different colored cushions for each of the different chair types.  Originally we were going to make our own cushions and buy our own fabric and everything, but then we found out IKEA had cushions for our chairs for $5 each.  And we were Done with dealing with the chairs.  


And that was our live-action HGTV episode! We're really happy with the results, and it was way cheaper than buying a new dining set.  The total cost of supplies (paints, stains, sealants, brushes, masks, gloves, etc) was ~$100 since we were able to borrow a power sander.  I have a new-found appreciation for working with furniture.  And a new-found hatred of chairs.   

(PS be sure to check out Moira Katson; writer of novels and donator of tables)