These are super fun. Usually used as picture cubes, a 'magic folding cube' (more formally called Yoshimoto Cube) is a cube made of 8 smaller cubes that can be unfolded multiple times until eventually it is inside out and then unfolded more until it is back to its original form. If you make one well, you can put photos on all sides of the exterior cube, plus larger photos inside, and as you unfold the cube reveal the different photos.
To make this, I used 8 identical wooden cubes, clear tape, and some stickers to delineate the different sides. The trick is to make good hinges for the cubes to rotate on (See schematic for simpler directions than my poorly worded ones below). Each hinge is between only two of the small cubes. You need to make each hinge double sided for support (in other words, tape the inside and outside of the hinge).
To make a hinge, place one layer of tape on the two cubes to connect them on top. Make sure that whenever you place tape, the cubes are flush against each other. Next, fold one cube over the other, so that the piece of tape now is between the two cubes. Place a piece of tape to connect the cubes again; this piece should be on the opposite side of the hinge as the first piece of tape.
You will need to make four of these hinges, for a total of 8 cubes linked in pairs. Next, you need to make hinges to connect each pair of cubes to the other cubes.
The layout for these hinges is shown in the diagram. Fortunately, all of the hinges are on the outside of the completed cube, so it is very simple to line up the pre-made pairs and connect them up. If you look at the diagram, you can start your cube simply by making your cube so that the hinges stack one on top of the other and face outwards (the 'C' set of hinges). Then, tape the front two columns of the cube (the 'B' hinges) and the back top and bottom hinges (the 'A' hinges).
To decorate the cube, I just put different dinosaur stickers on each of the original 6 outside faces. This means that when the cube is completely folded in, no stickers are visible (if you have more stickers than I do, you can also put stickers on these 'inside-out' faces). You may also want to decorate the interior sections that are revealed when the cube is simple unfolded into one long strip. Shown is a montage of my dinosaur cube. Note that when you decorate just the outside of the cube, you cover the outside plus two of the 'long' (unfolded) conformations, which means that the other 'long' conformation is completely hidden from view initially, as well as all of the exterior faces of the 'inside-out' conformation. If you look closely at the stickers, you can also see how each step led to the next by making one fold (or flipping it over).
Finally, here is a simpler folding video which takes a blank cube from 'right side out' to 'inside out.'
Wednesday, July 28, 2010
Monday, July 26, 2010
Garden Addition: Prairie Flowers
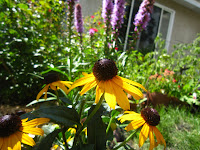 The past few weeks I've been debating putting in more prairie-esque plants in my garden, and recently finally decided to make the addition. In the end there aren't very many prairie-like plants, but I decided with limited space I would rather keep the plants well delineated and visible than try to make a 20 square foot grassland.
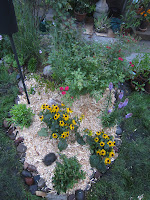 The border for the garden is natural river rocks, which I continued with in the expansion. Rocks don't have great weed control because there are always cracks between them that weeds will creep through, but on the plus side they are large enough that weeds don't seem to grow under them very often. Additionally, larger boulders can be put in among the flowers as accent pieces. These help keep the garden looking nice in the spring and fall when the flowers are still growing or starting to die back.
I use lots of wood chips as mulch and weed protection, plus it helps me keep track of how much plants are growing and keeps them visually separated.
Buying flowers this late in the season also means most things were very discounted!
Taller plants went towards the center of the garden (the tallest being prairie grasses and a rose bush that was already there), and then tapered down to the shortest plants around the edges of the garden. This ensures you can see lots of plants at once when looking at the garden, and also makes sure that the plants do not block each others light.
Monday, July 19, 2010
Pet Portraits: Chou Chou
This is my latest Pet Portrait, shown here next to its adorable subject Chou Chou. More on the subject here.
Saturday, July 17, 2010
Fruit Salad: How to make it rockin'
What is good? Fruit salad. What is awesome? Rockin Fruit Salad inside a Watermelon. This is a simple trick that my friend showed me (and, I have on good authority, most of the world already knows) to make fruit salad much more awesome.
Step 1) Buy a watermelon and other fruit. Aesthetically, the watermelon will give you green and red color, so if you buy blue and yellow fruit you will be covering quite a range of colors with fairly little effort.
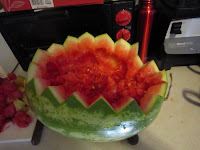 Step 2) Chop off top third of watermelon with a big ol' knife. Do this in a serrated pattern (just stab it and alternate the angle of the blade), and be sure to keep the top.
Step 3) Hollow out watermelon and replace insides with other fruit (and put some of the watermelon back in). You will also need to scrape the watermelon off the lid piece. One watermelon holds exactly one watermelon worth of fruit inside, so you will end up with as much leftover watermelon as you put in non-watermelon fruit.
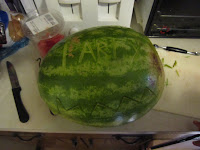
Step 4) Label appropriately. It is very embarrassing to bring the wrong rockin' watermelon to a gathering. I used a small knife and made very shallow 'v' shaped cuts into the melon to make the letters.
Step 5) When arrived at your event, you may further decorate your rockin' watermelon with toothpicks and whatever pattern of fruit you fancy, such as these pineapple tiki torches.
Step 1) Buy a watermelon and other fruit. Aesthetically, the watermelon will give you green and red color, so if you buy blue and yellow fruit you will be covering quite a range of colors with fairly little effort.
 Step 2) Chop off top third of watermelon with a big ol' knife. Do this in a serrated pattern (just stab it and alternate the angle of the blade), and be sure to keep the top.
 Step 3) Hollow out watermelon and replace insides with other fruit (and put some of the watermelon back in). You will also need to scrape the watermelon off the lid piece. One watermelon holds exactly one watermelon worth of fruit inside, so you will end up with as much leftover watermelon as you put in non-watermelon fruit.

Step 4) Label appropriately. It is very embarrassing to bring the wrong rockin' watermelon to a gathering. I used a small knife and made very shallow 'v' shaped cuts into the melon to make the letters.
Step 5) When arrived at your event, you may further decorate your rockin' watermelon with toothpicks and whatever pattern of fruit you fancy, such as these pineapple tiki torches.
Friday, July 16, 2010
Window Suncatcher Crystals: Video etc
Per request, here is a video of the light spectrum that is created by hanging cut crystals in a window in sunlight. This is the image you get if you are looking into the crystal from the rainbow it projects. The original post is here. These are fun decorations, and each crystal can create dozens of rainbows if the lighting is right.
This photo is a better example of the rainbows that a crystal makes. You can see all the way from a deep red to violet, and all the steps in between.
This photo is a better example of the rainbows that a crystal makes. You can see all the way from a deep red to violet, and all the steps in between.
Tuesday, July 13, 2010
DIY: Cheap Easy Screenprinting: Using a White Base for Better Colors
How to do Cheap Easy Screenprinting is here.
I recently wanted to make a print on a blue shirt (continuing the World Cup theme with Italy) and realized I most likely would need to have a white base coat to make the colors strong enough. This turns out to be pretty simple. Just make your initial print encompass everything you will eventually need colored. In my case, this meant everything that needed to be red, green, yellow, or white. This means the original print is pretty vague on the details, however, so it can help to make subtle lines to guide later painting (see the white circle which is lightly outlined in the initial print). Once the white base is down, let that dry (do not iron), then simply hand paint on the next colors. If you only need one color down, you could in theory just re-print on top of the white. I was very happy with how the final colors turned out, and will definitely be doing this again whenever I have a multi-color print or am using dark colored shirts. Hand painting on the screen printing ink works pretty well, however one of my colors (green) was not a very liquid mixture, and did not spread as well as I'd hoped. The red and yellow however were pretty much just like any other acrylic paint. I use paint brushes and sometimes toothpicks for smaller details.
I recently wanted to make a print on a blue shirt (continuing the World Cup theme with Italy) and realized I most likely would need to have a white base coat to make the colors strong enough. This turns out to be pretty simple. Just make your initial print encompass everything you will eventually need colored. In my case, this meant everything that needed to be red, green, yellow, or white. This means the original print is pretty vague on the details, however, so it can help to make subtle lines to guide later painting (see the white circle which is lightly outlined in the initial print). Once the white base is down, let that dry (do not iron), then simply hand paint on the next colors. If you only need one color down, you could in theory just re-print on top of the white. I was very happy with how the final colors turned out, and will definitely be doing this again whenever I have a multi-color print or am using dark colored shirts. Hand painting on the screen printing ink works pretty well, however one of my colors (green) was not a very liquid mixture, and did not spread as well as I'd hoped. The red and yellow however were pretty much just like any other acrylic paint. I use paint brushes and sometimes toothpicks for smaller details.
Saturday, July 10, 2010
DIY Batman Costume: Batarang
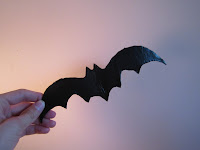 This was a super quick, super easy way to make a fun batarang that can survive a decent amount of being thrown into walls. All it took was cardboard and Plasti Dip.
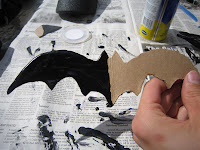
 I just cut out the cardboard shape, then dipped it one half at a time in Plasti Dip a few times. Plasti Dip is a liquid rubber coating which can be used to make handles/grips on tools and things, or coats cardboard batarangs in a rubbery, durable black coating. I will definitely be using this stuff for other parts of the Batman costume.
Tuesday, July 6, 2010
DIY (do it yourself) Batman Costume: Mask
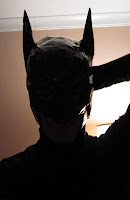 I'm planning on an epic (hopefully) batman costume for this Halloween. To start, I made a mask. Looking up other costumes online I found a variety of options, but this one was by far the easiest and cheapest. You could easily use this basic system to make pretty much any custom fit costume headgear. All you need is: plastic grocery bag, paper grocery bag, cardboard (not much), duct tape (I used silver duct tape first, then black duct tape to finish).
Step 1) Form: Put the plastic bag on your head (make sure to cut space for your mouth to breathe). Wrap your head in duct tape. Make sure the tape is nice and tight. This will make a very nice mold of your head. You will want to include your forehead, but do not cover your eyes/mouth/etc. When you are happy with the wrap, take it off your head (you may need to cut a slit down the back) and trim off excess plastic bag.
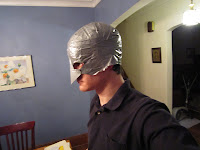 Step 2) Nose: To make the nose, I first made a bridge across the face of the mask using two pieces of duct tape stuck together (so it wouldn't stick to my face). Then, I cut out a nose with cardboard. Fit the nose over your own nose to size it before taping it to the mask. The nose in the actual batman mask is very severe, and it took me a few tries to get the right size, and even then I had to trim it down later to change the angle of it. This is definitely the trickiest part of the mask. Once you tape the nose onto the mask, you will want to cut out the duct tape behind it so that your nose can fit into it. At this time I also added (in the same fashion as the nose bridge) a chin strap to help the mask stay on.
 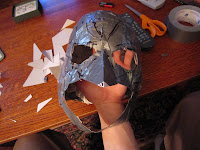 Step 3) Design: First, cut holes for the eyes. It's very easy to fill in mistakes (just use duct tape!), so don't worry about making them too big. Now that you have the basic shape of the mask, draw in where you want the 3D aspects of the mask to go. For the Dark Knight mask, this meant eyebrow ridges, cheekbone ridges, lines going away from the eyes in a sort of starburst, and two larger crests running over the top of the entire mask. Once the areas are drawn in, fill them in by rolling up strips of grocery bag and taping them over the places that need to stick out. At this point I only made small ridges, and added more to them after completing the ears. If at any point you mess up, you can use a scissors (carefully!) to trim down a part you don't like.
 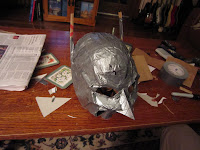 Step 4) Ears: The ears started as tubes of rolled up grocery bags. I taped them down a few times to get the correct placement and angle (pretty far back) and trimmed them for size. Once they were in the right spot, I added duct tape and more rolled up paper bag to give them the right volume and shape. Rolling up strips of grocery bag is how all the depth is added to the mask.
 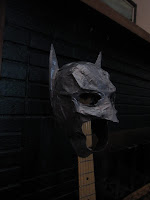 Step 5) Emphasize: Now that the ears, nose, and basic ridges were in place, the mask had all of its components. From here you just need to emphasize each part. The ridges are very extreme in the mask and during construction may seem almost grotesque. Again, if you think you over-did anything, you can use a scissors to trim back. It surprised me how large I had to make the face ridges before they looked right.
 Step 6) Color: As a final touch I coated the entire mask in black duct tape. I also colored in the lines along the edges of the duct tape with a black permanent marker.
See Part II of making the mask here
See the whole costume here
Direct Links to Specific Parts:
Batman Chest Plate
Leg Armor
Batarang
Bat Belt
Bat Gauntlets


