Monday, September 28, 2015

DIY Jewelry: Captured ('Caged') Bead Chains


This is a fun technique I learned this summer.  I saw a necklace that used this technique at The Bead Monkey and then found this excellent tutorial video online.  So if you want a video version of this, click that link! If you prefer photos and text, read on!

The Basic Idea: Each cage is made with 4 jump rings which are joined to make sort of a tiny box for a 'captured' bead, which is not connected to anything.

The hardest part is finding the right size jump rings so that they fit around the bead, but are not so loose that the bead falls out.  I used 8mm beads and 11.5mm jump rings, and they were just a hair larger than I would have liked.  They worked well as long as the jump rings were perfectly tightened, but if they were loose at all the beads sometimes slipped out.

Of course you can experiment with different types of beads and different color jump rings to get a wide variety of results!


How to make the cages:

1) Start with two small connecting jump rings.
2) Loop two of your large jump rings ('A' rings) through these two small jump rings


3) Loop two more large jump rings ('B' rings) through the 'A' rings

4) Hold the small jump rings together, and let the large jump rings fall open, sort of like flower petals.

5) Place bead inside the opened rings

6) Close rings over bead.  The lower 'A' rings will be close together at the bottom then spread apart.  The top 'B' rings will be spread apart then come together over the top of the bead.

7) Thread two new 'A' jump rings through the top of both 'B' rings, one on either side of the bead.  Notice how the new 'A' rings sit INSIDE the ends of the previous 'A' rings. 

Add you next 'B' rings and continue!

This is how the jump rings fit together as you add more cages (again, notice how the ends of one cage fit inside the  previous one):


After you have made your last cage, use two more smaller connecting rings to 'close' the chain.  This is how the caged bead chains attach to the regular chain:


As I mentioned before, the hardest part is finding jump rings and beads that are 'just right' sizes for each other.  If the bead is falling out easily you need a larger bead or a smaller jump ring.  In general it seems that the jump rings should be just a little larger than the beads.  Thicker jump rings will need smaller beads.  If you know a formula for determining bead/jump ring size please let me know!

If you make the entire necklace and everything seems to be going well then suddenly one of the beads falls out it may be that those jump rings weren't quite tight enough.  Sometimes I will over-tighten jump rings if a bead keeps falling out and I don't want to get a larger bead.

Sunday, September 27, 2015

DIY Jewelry: Pearl Necklace


I've made Amy a few different pieces of jewelry over the years, and I'd been wanting to get her a pearl necklace for awhile.  However, a complete pearl necklace is super expensive! So I decided to learn how to make one myself.  Below is a description of materials and methods that hopefully will be easy enough for anyone to follow along themselves!

Materials:

-Needle nose pliers
-Pearls
-Silk Bead Cord
-Lobster Clasp and 2 Jump Rings
-2 Cord Clasps

Pearls: You can buy these in strands at bead/craft stores (I got mine at Michaels).  They come in 'round' and 'potato' and the larger and rounder they are the more expensive.  Because of this variation, you can adjust your pearl quality to fit your budget pretty easily.  How many pearls you need depends on the length of the necklace you want to make, but roughly you need as many inches of pearls as you want of necklace (so a 24 inch necklace will need roughly 24 inches of pearls).  You can also of course use fake pearls, or a completely different type of bead! Make sure the pearls have holes drilled in them for the cord. Use a handy necklace size chart like this one if you are uncertain how long to make the necklace. 

Silk Bead Cord - This comes in different gauges (#2,4,6 etc), and each corresponds to a different diameter.  I used #4 (0.6mm) which fit through the holes in the pearls (when you buy the pearls it should say the diameter of the hole in them) but was still strong enough to hold the weight of the necklace.  You don't want to just use the smallest possible cord because it needs to be strong and the knots you tie in it need to be large enough to stop the pearls from sliding.  The cord I bought came with a needle attached, which is GREAT because otherwise it is awful trying to thread all the beads onto the cord.  Keep the entire length of cord (usually comes in 2 meter lengths) because with all the knots you will be tying you will use up a lot of it!

Lobster Clasp: I've been told that these are the most comfortable and easiest to use of all the different ways to clasp a necklace.  Results may vary.

Jump Rings: These are little rings of metal that are cut at one point so you can bend them open and closed again.  The jump rings need to be able to fit through the hoops of the cord clasps, and one of them also needs to be small enough to thread the Lobster Clasp onto it.

Cord Clasps: This is a little tube with a hoop at the end so that you can tie off a cord and then attach a jump ring to it.

Ideally make sure your Lobster Clasp, Jump Rings, and Cord Clasps are all the same tone of metal!

Making the Necklace:

A) Starting: First you need to thread one cord clasp onto the cord (put the needle in through the hoop side).  Tie a knot on the non-needle end of the cord, then tie a second knot over this knot.  Slide the cord clasp all the way down to this knot, and make sure the knot cannot slide through the cord clasp!  I forgot to take a picture of this step, so here is a very terrible illustration:

Now tie another knot on the other side of the cord clasp.  Tie the knot as close to the cord clasp as you can.  This knot will prevent the first pearl from running into the cord clasp. Another terrible illustration:

Here is a diagram of the two ends of the necklace, for reference:
We will add the jump rings and lobster clasp at the end.

B) Adding Pearls
There is a knot tied after each pearl, which prevents it from moving.  The key is to make the knot as close to the pearl as possible.  I used a needle nose pliers to make this a bit easier, after struggling for a long time to do it by hand.  This is by far the most time-consuming aspect of this project, and, fair warning, can take hours depending on how long a necklace you are making. 

1) Add a pearl on the far (needle) side of the cord and slide it aaaaall the way down to the knot you just made.
 
2) Make a big knot (do not tighten it) on the far side of the pearl

3) Use your needle nose pliers to grab the cord just as it exits the pearl.  The far side of the loop of the knot must be past the pliers (the cord you grab must be 'within' the knot) (see picture)


4) Tighten the knot down towards the pearl and the tip of the pliers

5) Release with the pliers once the knot is almost tightened, and use your fingers to push the knot closer to the pearl and cinch it.

6) Repeat until the desired length of necklace is accomplished.


C) Tying off the cord: Now you need to tie off the other end of the cord into a cord clasp.  The technique I used to do this is very similar to what I did for the pearls themselves.

1) Thread the cord through the cord clasp

2) Tie a very loose knot on the 'hoop' side of the clasp

3) Grab the cord immediately as it comes out of the cord clasp (within the knot) with a pliers (grab as close as you can to the cord clasp). Again grab the cord within the knot.


4) Tighten the knot down towards the tip of the pliers.  Let go with the pliers once it is almost fully tightened and push it down further into the cord clasp with your fingers.
5) Tie a second knot in the same place to make sure it stays! Once you are sure the cord clasp cannot slide over the knot, you can cut off the rest of the cord. 

Here is a third terrible illustration to show you what BOTH ends of your necklace should now look like:

D) Finishing
Open one Jump Ring (bend it open) and thread the Lobster Clasp onto it.  Now open both Jump Rings and thread them onto the hoops of the Cord Clasps.  Close the Jump Rings using needle nose pliers.  
Open the Lobster Clasp and connect it to the other Jump Ring.  Ta Da!
(shown: open and closed jump rings)


Again, the two ends together should look like this:


The little ball of pearls at the end is made by just tying a knot with the strand.


Sunday, September 20, 2015

Chou

The latest ink drawing: Chou!


Saturday, August 15, 2015

Da Vinci's Degas

I was inspired by seeing Da Vinci's Codex Leicester at the Minneapolis Institute of Art this summer to do a work loosely based off the Vitruvian Man.  My wife is a big fan of Degas' ballerinas, so I decided to try to blend the two.  The final piece is 8x10, oil pastel over pencil.  I have included a step by step look at how it developed.


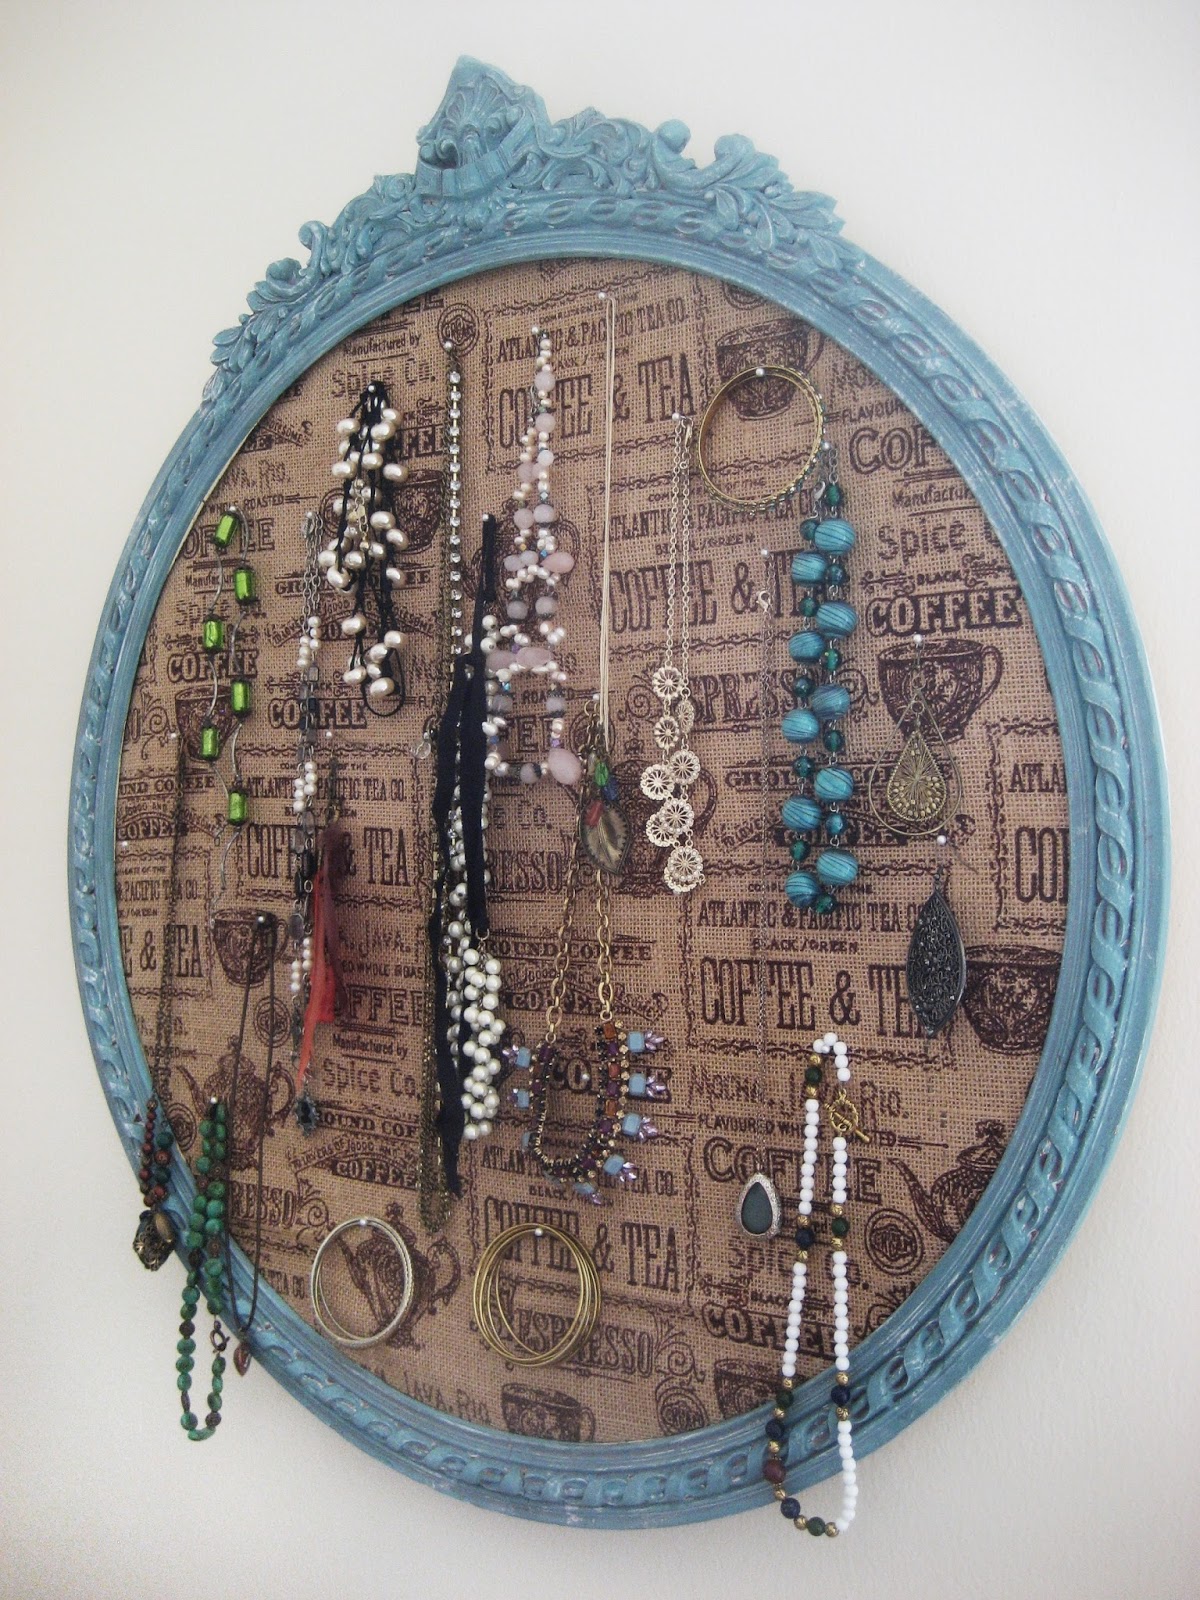
DIY: Framed Cork Board Jewelry Organizer with Burlap


I wanted to make my wife a jewelry box that was extremely high capacity and didn't take up too much space.  My wife found a great old frame at an antique store and suggested we convert it into a jewelry board. I recently managed to get around to it, and we've been quite pleased with the result!
For other jewelry boxes, check out here and here

Supplies:
-Empty Frame
-Foam Presentation Board
-Cork Board Roll
-Burlap Cloth
-White Glue
-Staples
-Nails (for keeping board in frame)
-Pins (for hanging jewelry)
-Paint (for painting frame if needed)


The Frame:  The frame we bought is about two feet across, and was covered in chipping paint.  I really wanted to accent the design of the frame, so I painted it with a blue/green base coat, white highlights, and a coffee brown shadow.

First the base coat: The original frame color was white, so it was pretty easy to get a nice strong color base.
Next I dry-brushed on white to accent the carving.  Dry-brushing is an easy technique where you lightly dip the paint brush in paint, then essentially take all the paint back off by brushing the paint onto a paper towel or other surface.  With just a hint of paint left on the brush you lightly brush over the object and only the highest points will become painted.  


Finally I did a wash with a coffee brown.  To make a wash, get a small container of water, then put a small amount of paint in the water.  I think I usually end up with about a 2:1 or 3:1 water to paint ratio.  Use a brush to transfer the watery paint onto your frame.  The paint will flow down into the crevices, giving a nice shadow.  Careful not to transfer too much liquid or it will take forever to dry.  


The Board: 
From outside-in it goes: Burlap, Cork Board, Foam Board.  The Cork Board and Foam Board are glued together, and then the Burlap is wrapped around them and stapled down.  This whole package is then put into the frame and tightened in using nails or staples. 

First I cut out the foam board and cork roll to fit the frame.

We had a circular frame, so cutting the foam and cork was a bit trickier than it would be with a rectangle or square.  To make the circle I used a string and pen, as shown below.  The string is 1/2 the diameter of the frame, and it is pinned to the center of the board.

It turned out our board was not wide enough to make the complete circle, so I needed to take the ends of the board and cut the rest of the circle out.
The cork board was pretty delicate, and crumbled easily, but I managed to get a nice circle worth cut out.  I then used white glue to adhere the cork to the foam board. I set some books on top of the cork board while the glue dried to prevent it from rolling up. 


Now that I had my pieces cut out, I put them into the frame to make sure I'd actually measured it all correctly.

The boards fit pretty snugly, so it was time to add the burlap.  Originally I was going to use a plain burlap, but the place where I bought it had a printed burlap on sale that seemed very appropriate for my wife.

I placed the burlap over the cork board side of the circle, and then placed this 3-layer combo back inside the frame to make sure there was room enough for the burlap cover.


Now that I knew the covered board would fit in the frame, I stapled the burlap tight against the board.  It is important to make sure the burlap on the front of the board is taut and not hanging loose.  This took quite a few staples to get the burlap around a circular board (another reason it is much easier to be using a rectangular or square frame!).  When I was finished I placed it back into the frame.


To secure the board into the frame I put nails into the frame and bent them down into the board. If you have a staple gun you could probably as easily staple the board into the frame or any of a number of different options (duct tape works well too).


Finally it was time to hang the board on the wall and add pins to hang jewelry.  I used pearl-headed pins because they fit with the overall look.

Finally it was done!  The frame is two feet wide, so the final board is able to hold a TON of jewelry.